SGI R4k Indigo Elan
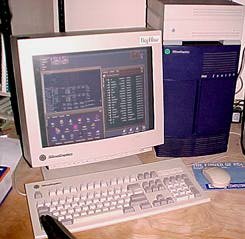
This is a machine I'd drooled over since it's inception around 1989/1990. It just looked so cool. The purple tower design is a real classic, one of the best looking SGI machines ever made. This particular model is no slouch either. It's an R4400 running at 150Mhz, with 96Megs of RAM and the Elan Graphics option.
Elan Graphics give the machine a real-time 3-D ability that is equivalent to even today's high end PC's with one exception -- it has almost no texture memory, so as long as we're not dealing with a textured model, this machine can spin polygons with the best of them. I find it useful these days to explore the realm of VRML, and it's fully capable of Net-surfing and other internet duties. IRIX 6.2 even includes a built-in web-server, so while I'm surfing, someone else could be hitting a site hosted on this machine, and for the most part, you'll never feel the performance drag at any point.
It's a very capable, very powerful machine, even though it's about 8 years old. Although IRIX has many security loopholes, it's by far the easiest to use "X" system I've seen. You don't even need to know Unix to use Irix, which, in some people's opinion, is a bad thing -- but it's definitely a great way to start learning Unix.
Indigo Hardware Info
The Indigo came in several "flavors" - but let's break it down to the basics -- R3k and R4k. The R3k models are the older in the series, using a slower processor and also using a proprietary RAM system.  R4k's are newer, more powerful and use standard 72pin True Parity SIMMs. A variety of Graphics Boards were created for the series, from a simple 8-bit display (LG1 Graphics) to the Elan Series (4 geometry engines & 24bit color).
The Machine uses an elegant design. As you can see from this block diagram of the insides, the CPU card and the graphics card sit next to each other, together occupying half of the unit. The machine can run with no graphics card, but then you'd be limited to using a terminal through serial port A as the console.
Next to that from top to bottom is the power supply and 3 drive bays. Each bay can hold a single 3.5 inch device. Note that the upper two bays are accessible by a "door" in the case, as these bays were meant for removable media devices such as Tape drives (I have a 2BG DAT in one bay). The SCSI ID is set automatically by plugging the drive into a special "drive sled" which then connects with the backplane of the machine, similar to the way SCA connectors now work.
IMPORTANT! It's important to note that you should NOT attempt to force the SCSI ID of any internal device, you should let the sled and the backplane do their job. In this particular machine type, the SCSI controller is SCSI ID ZERO. Internal devices are ID 1 to 3 from bottom to top. External devices can be ID 4 to 7. Even if you have only 1 internal device, you should only use ID's 4 to 7 for external devices.
The backplane, (not pictured in my diagram) connects all the elements together. The only other item not pictured is the internal speaker, which is also part of the power supply's structure. The Indigo has pretty good sound capabilities, and using the Unix MPG123 program, I'm able to play music MP3's just fine.
Interior Components
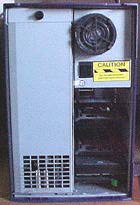 Here's the Indigo with it's front faceplate removed. From here you can see the tall rectangular metal casing that shields the 2 main boards (the CPU board and the Graphics board), the PowerSupply which also has the built-in speaker, and the 3 drive bays, with the lowest drive bay containing the boot drive.
Note that the other two drive bays are empty in this photo and that they line up with the hindged door that is part of the front faceplate. Thus, the two devices that sit in these drive bays can be accessed from the outside of the machine.
This makes them useful for DAT tape drives, SCSI floppy, or other 3.5 inch removable media devices. Then, by simply opening the door, you've got access to these devices which are otherwise hidden by the door. A very stylish design.
Anyhow, let's take a look at the 2 boards that live behind the tall rectangular metal casing on the left side.
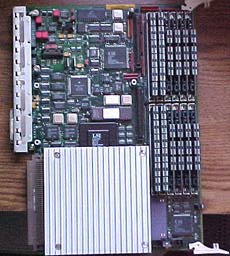 This is the CPU Board which is identifiable because of the tremendous aluminium heatsink on the CPU itself. It should be noted here, that, although you cannot see it in this photo, the CPU is a "module" a seperate small card the plugs into the mainboard. This allows CPU upgrades to be performed with a minimum of effort.
This machine has 96 Megabytes of RAM, as twelve 72pin SIMMs, arranged as three banks of 4 SIMMs per bank. Each bank can have different density RAM, but all SIMMs within a bank must be the same.
The RAM bank layout is unusual - it is 2 SIMMs on the upper, and then 2 SIMMs on the lower. This why you see the different SIMMs in bank 3 where they are.
The shiny metal on the upper left of the photo is where all the connectors are for ethernet, keyboard, sound in and out, etc., etc.
The brownish connector just to the left of the CPU's heatsink is where the CPU board plugs into the Indigo's backplane (which I will get to later).
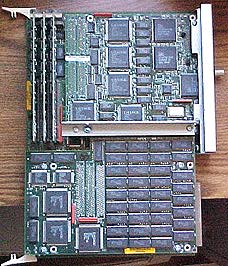 This is the Graphics Board. In this case, it's a pretty large card because this is the Elan Graphics package. LG1 Graphics, the simplest option for Indigos, is a considerably smaller and less complex card.
Yes, those are SIMMs you are seeing, but those are proprietary texture RAM modules, and they aren't all that big - the Indigo, while it will support some textures, isn't really that fast at moving 24bit textures. While it's geometry engines will move polygons, the texture slows it down considerably.
This makes the Indigo Elan great for CAD, but not for 3-D games.
Again, it's hard to see in this photo, but the Elan Board is really TWO boards, sandwiched one atop the other.
On the right of the card, you can see a BNC connector. That's not ethernet, but rather a connector to syncronize with special 3-D glasses. Below that on the right, is the brownish connector to the Indigo backplane.
The white tab thingies (that look like aligator clips) on the left side, top and bottom on the board, are snaps to hold the card securely to the case of the Indigo once pushed into it's slot to connect with the backplane. These little plastic snaps are usually the first point of failure for cards that been been in and out of a machine too many times.
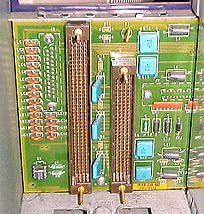 Here's where the CPU Board and the Graphics Board connect to inside the Indigo itself. Note that the CPU board's connector is much larger and therefore, obviously, the positions of the cards are NOT interchangeable!
The part of the backplane not shown here connects to the SCSI drives and to the power supply.
It doesn't look like there's much airflow here, yet, by some miracle of engineering, it all manages to stay cool enough.
Above this piece of the backplane is an opening in the back of the case which allows all the external connectors for the boards to poke out of the box, so you can do things like connect the keyboard and monitor.
Well, this about wraps up a look at the inside of an Indigo. I'll have more information as soon as I can dig up some!
Here's a link to a cool site with TONS of information about this particular machine.
The page referenced above is also mirrored at www.reputable.com.