The Sun Sparc LED Hacks for ObsolYte!
Many people have asked me about the lights I have managed to add to the ObsolYte webserver. In this page, I'll attempt to document the wild and wacky world of adding a few LEDs to the little IPX lunchbox, as no computer can ever have enough status lights.
The 3 LEDs thus far...
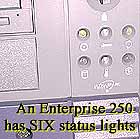 My one complaint about Sun Sparcs are that they don't have enough lights on 'em. More recent models like the Enterprise 250 have tons of lights, so Sun obviously learned at some point that hardware guys like lots of LEDs blinking.
Most Sparcstations that you'll be able to get your hands on have only one little power light. And, to add insult to injury, if you're using a 2.1 or 2.2 Linux kernel, the power light will go out as it begins to load the kernel (which is the situation I am in), and stay out for the duration of time that the machine is running. Grrrr. It might as well not be connected to anything!
 My machine has 3 status lights. The top one and the bottom one are fairly obvious - A large green power light, and a bright yellow HD access light. The red "Memory access" light is the trickiest of the bunch, and not really do-able on anything other than an IPX or a Sparcstation2.
Once again, I'm making use of the floppy bay to hold all my additions to the machine. In this case the floppy cut-out in the case is where I'm mounting my status lights. Now, in my situation, I was able to make use of scavenged parts off of other equipment, but it's fairly easy to find and make use of any existing pre-mounted LEDs you might find in something you're taking apart.
If you don't have access to anything you can rip apart for the lights, a trip to Radio Shack for some LEDs and perfboard and a trip to a hobby shop for some square plastic tubing should cover the problem. I'd also suggest you scavenge the wiring from a PC case which has the LEDs connected by wire to jumper ends, allowing quick, easy connection and disconnection.
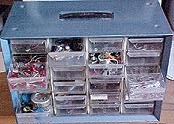 A bit of advice to all would-be parts scavengers/hardware hackers: Keep a good parts bin. Find one of those plastic tray small-parts organizers (look in your local K-mart in the tools area), and keep all the pieces you ever scavenge, or pick up at a parts place. This will become a valuable resource for components time and time again.
The Power Light
This is by far the simplest of the 3. All I did was add a regular-size green LED to the wires that normally supply power to the floppy drive.
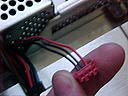 In this image, there are two black wires and one red. I cut one black and the red, put a volt-meter to it and found out it's got 5 volts running through it. By using an in-line resistor, I stepped down the power to 3 volts, hooked up the LED, glued that to a bit of transparent plastic, which was then glued to the "upper" corner of the floppy hole.
As such, whenever the power supply is on, the LED gets power. Instant power light, no matter what Linux Kernel or other OS choice I make!
The HD Access Light
Almost all Harddrives have a set of pins to attach and external LED, even the ones with the LED on the board of the HD usually have the pins to hook up a secondary LED. You'll have to look up your model drive on the site of the manufacturer of the drive. They usually include documentation online covering all the configuration jumpers and so forth. You'll find the jumper set for hooking an LED in that material.
The LED power will be supplied by the drive. By the way, something important I should mention for anyone not intimately familiar with LEDs is that they only work one way -- if you send them negative DC current on the positive pin and vice-versa, it won't light. Reverse the leads to the LED and it'll work.
From this point, once the HD is correctly illuminating the HD when the HD is being accessed, just again figure out how to mount the LED with glue or something, and you're set.
The RAM Access Light
 Because of where I'm getting power for this LED, this hack will really only work for an IPX and a Sparcstation 2. On both of these machines is an extra connector to supply power for an optional Sbus-based RAM card, that would allow the machine to have as much as 128MB total.
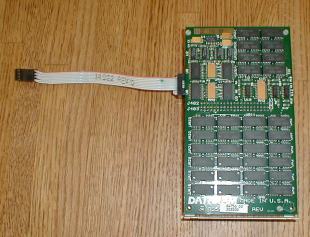
If you look at this image of the DATARAM SBUS 64MB upgrade for the IPX/SS2, that ribbon cable coming off the side connects to a power connection on the motherboard, as the SBUS connector alone doesn't carry enough current to run all that RAM. This jumper block is described as J0705 SAX on the motherboard illustration on the main IPX page, and on the SparcStation2 page.
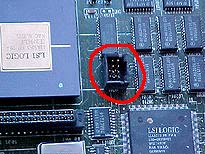 You'll spot that power connector near the slot closest to the power supply on the SS2, and I've circled it on the image I took of the IPX motherboard.
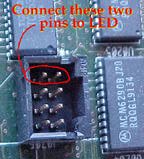
While fiddling with my volt-meter, I noticed that there was power coming off the uppermost two pins (circled in the close up image below). So, just to see what would happen, I connected an LED to those pins. The good news was that I didn't blow up the Sparc by doing this. It's also a good thing that LED's don't do anything if connected backwards, as I don't remember which side was positive... (I think the pin on the left was positive...). Also, in case this picture doesn't make it clear, it's the rear-most set of pins, i.e., the set of pins furthest from the front of the machine.
 Once the LED was in and operating, what I observed was the following:
- The LED is always on, but there are two states, low and high (not bright, and bright)
- During bootup, as the HD is being accessed, the RAM light is in the low state, when the HD isn't being accessed, the RAM light is in the high state (i.e., alternating access)
- When Linux is decompressing the kernel, the RAM light is high.
- Once boot is complete, and the machine settles down, RAM light is low.
- During periods of activity (running commands, doing anything memory or CPU intensive, the RAM light is high (intermittently low and high).
Basically, since the RAM light is never high when the HD is being accessed, but alternates with HD, I can assume that I'm observing the CPU fetching from RAM after having had the HD load into RAM. So this light is either showing RAM activity or CPU activity. Either way, it's a cool addition, and makes the Sparc look much busier than it really is, with the yellow and red LEDs alternately flashing like some kind of flip-flop circuit.
And obviously, if you've got one of those SBUS RAM cards, you're not going to be able to do this either, at least, not without risking cutting the wires to the card.
As with the other lights, the hardest part of creating this hack will be the mounting of the LEDs to the case. Those folks who don't mind drilling into their cases might want to mount the LEDs below the floppy by drilling holes in the lower half of the case and mounting the LEDs there. How you do it is ultimately up to you and what you're capable of slapping together (plastic modelmaking skills do come in handy, even after all these years) -- and of course, what extra bits and pieces you might have in your parts bin.