|
|

|
I am posting this assortment of notes and observations as a kind of "thank you" to the numerous people who have replied to my posts in the past. The free flow of information is the life-blood of the internet community, and this is my feeble attempt to maintain that flow, while at the same time repaying the kindness shown me by other members of the community in my rather obsessive attempts to revive a defunct 4D professional series machine.
I have posted a number of messages concerning my project, and I can say that all the replies I have received have been quite helpful. One of the things you learn early on as a denizen of the net is the utility of Usenet posts. You also learn that the volume of answers can convey almost as much information as the content of those answers. If I post a question and receive a significant number of replies, then I can be relatively certain that others have run across (and possibly solved) the same class of problem. If, however, I receive no responses, it indicates that this is a new problem not previously encountered (quite unlikely, due to the age of the equipment in this case), the problem represents a true hardware-level failure (usually at the IC level) or the problem is due to some fundamental stupidity on my part (by far the most likely scenario!). This means that it's time to re-evaluate the procedure which caused the problem, which usually leads to an alternate approach which inevitably works. During this project, I have only had 2 genuine hardware failures, both of which had very little usenet response. The rest of the low-response questions were solved by re-reading the documentation available, or using my common sense when it was at last evident that this was not a common bug.
The point of this diatribe is that if you don't receive an immediate response to a usenet post, don't immediately repost it! Think the problem out. If none of the other half-million or so people who have seen your post have run across your particular problem, then the odds are that it's due to some fundamental mistake or misunderstanding on your part. Step back and look at the whole procedure again. Then, if you still can't think of a way around it, repost the problem with more info, or describe the event from an earlier point in the timeline.
Now, back to my main topic. This whole adventure started when when I developed a craving to have my "own" SGI at home. I use one quite frequently at my job, and it did not take very long for me to fall in love with the critter :-}. Unfortunately, prices being what they are, I decided to piece one together from parts obtained via the net (being a hardware hacker at heart!) This proved to be quite a challenging project. Cost-wise it was a toss-up between a Professional IRIS or Personal IRIS, depending on what I could lay my hands on (At this point in my project, I wasn't about to get picky :-). The first machine to come my way turned out to be a Professional series 4D/70GT. Machines in the Professional IRIS series are relatively obsolete right now, and their bulk, slow speed and power requirements have made them unattractive to their original owners. As a result of this, a number of them are most likely heading for the dumpster as we speak!. Fortunately, I was able to locate one of these scrapyard refugees via the net. Needless to say, it was nonfunctional and incomplete. This resulted in a rather unique learning experience.
Because of the size and weight involved, shipping is not an option with these critters! After a marathon 400 mile drive, I finally arrived back home with the beast in the back of my vehicle. I strongly suggest that you get a friend (or three!) to help you unload. I tried it myself. Hopefully, my physical therapy sessions will end soon.
The following document started out as a "how-to" file centered around the 4D/70GT. I am currently trying to expand it into a "used-sgi-hardware" reference, similar to the excellent one available for older Sun systems. It is not my intention to "compete" with the official SGI hardware FAQ! Quite to the contrary, I intend this document to serve as an unofficial hardware hacker's supplement to the official SGI FAQs. I have tried to avoid duplicating information available in the official FAQs, except where such duplication serves to enhance the clarity of a topic being discussed. Along a similar vein, I have tried to avoid including information available via IRIX man pages, except where such information may aid in the initial boot stages where the man page facility is not available to the poor fool ^h^h^h^h^h experimenter trying to boot a system for the first time.
I would eventually like to include information about the Indigo and Power series machines. Needless to say, my main emphasis has been (and will continue to be) on machines which I currently own and can tinker with, so information about these and other IRIS series may not show up until I can locate enough hardware tidbits to bring up a machine in that series.
This is a work-in-progress, so please excuse any errors. If you do spot a problem, or have some info that would be useful to include, please email it to me and I will try to incorporate it here. Please note that this is an experimenter's document. Whenever you tinker with hardware, you run the risk of damaging the hardware, yourself, or both! Some of the information presented in this document comes from old usenet posts of questionable veracity. Some comes from my experiments and observations (and even guesses!) Where possible, I have tried to indicate the reliability of the source. Never trust anything you read... Always verify it with a O'scope or meter. Please pay heed to the following:
WARNING!: I am not responsible for whatever damage you inflict on your system or yourself! I am providing this information in good faith, and in the hope that it may help someone else through the hurdles that I had to leap. I ferverently hope that common sense will prevail in it's application! I am not responsible if you toast your system, blow up your house, barbecue your cat or fry yourself! Please use COMMON SENSE when playing with electrical systems. If you have the slightest doubts of your ability in these matters, DON'T TRY! Find a professional or friend with experience to help you!
-al-
Document changes will be reflected in the version number, [X.Yz]. A change in the major verion number X will reflect the addition of information about a new platform. The addition of a new chapter about a currently supported platform will be reflected by a change in Y. Corrections to or enhancement of a current chapter will result in a change in z. Grammatical or spelling corrections will not result in a change in the version number.
There are a number of very good information sources on the net. To start with, you should print out a copy of the official SGI Hardware FAQ. this and other official SGI FAQs will be invaluable to anyone trying to revive a defunct SGI.
Another useful source of information is the comp.sys.sgi Usenet archive. This archive can be extremely helpful if you simply want to browse through older postings looking for material that might have some bearing on your problem. A good deal of the material in this document was derived from this archive. If you would rather use a search engine on the archives, try Harry Mangalam's SGI WAIS page or the Silicon Graphics Search page.
SGI has recently expanded the number of on-line manuals which are available through their website. Check out the SGI Technical Publications Library for more information.
Scott Henry has an excellent page describing the trials and tribulations of Configuring and Debugging SLIP and PPP Connections. You will also find a very useful discription of the Serial Port Design History of the ports on Personal IRIS and Indigo systems. I strongly recommend reading this if you are trying to use Macintosh peripherals (such as MIDI adaptors) on your Personal IRIS 4D/30-35 or Indigo.
If you are considering the purchase of an older SGI system, you should take a look at The Buying an SGI System FAQ before you buy. It is very well done, presents quite a bit of information on the Personal IRIS series, and in addition will give you some idea of what kind of problems you are letting yourself in for :-)
If none of the above information deters you, then you are truly a hardware hacker! Read on!
Finding both complete (used) SGI systems and repair parts can sometimes be an intimidating process. There are a large number of vendors specializing in workstation hardware on the net, but many are only interested in corporate or medium sized business accounts. Often, the hobbyist is left in a quandry as to where to look. The following source list is divided into 2 parts. The first part consists of vendors that I have dealt with personally, and with whom I feel comfortable in recommending. The second part consists of vendors that I have not dealt with, but who seem to have a decent net reputation (i.e. I haven't run across pages of "Don't deal with xxxx, they'll $%#$# you over..." posts.)
Apparently, SGI supplied a number of complete systems to CDC for resale (or possibly internal use?) as CDC products in the late '80s. As far as I have been able to determine, the only change CDC made to these systems was to rebadge them, and possibly equip them with CDC-sourced peripherals such as hard disks, etc. The following is an incomplete (and probably inaccurate :-) list of CDC system part numbers and the closest equivalent SGI system.
| CDC | SGI | CDC | SGI | ||
|---|---|---|---|---|---|
| Cyber 920-254 | 4D/420 Server | Cyber 910B-537 | 4D/60 (G Graphics) | ||
| Cyber 910B-430 | 4D/20 Entry Graphics | Cyber 910-437 | 4D/20 24-bit(G?) Graphics | ||
| Cyber 910B-440 | 4D/20 "G" Graphics | Cyber 910B-450 | 4D/20 "TG" Graphics | ||
| Cyber 910-460 | 4D/25 Entry Graphics | Cyber 910B-460 | 4D/25 Entry Graphics | ||
| Cyber 910B-465 | 4D/25 "T" Graphics | Cyber 910B-470 | 4D/25 "G" Graphics | ||
| Cyber 910B-475 | 4D/25 "TG" Graphics | Cyber 910B -482 | 4D/30 Entry Graphics | ||
| Cyber 910B -483 | 4D/30 "G" Graphics | Cyber 910B -484 | 4D/30 "TG" Graphics | ||
| Cyber 910B -485 | 4D/35 Entry Graphics | Cyber 910B -486 | 4D/35 "G" Graphics | ||
| Cyber 910B -487 | 4D/35 "TG" Graphics |
Note that anything designated CDC 920B-XXX constituted the server version of the 910B equivalent (i.e. no graphics.)
Because of the graphics and memory limitations, certain versions of IRIX seem more suited to some of the older platforms than others. The two recommended versions of IRIX for older hardware are the various flavors of IRIX 4.0.5 (with 4.0.5f being the most recent general hardware support release), and IRIX 5.3 (with patches applied?).
(anyone have more details as to OpenGL vs. Graphics hardware support?).
| CPU | Memory | OS | Notes |
|---|---|---|---|
| IP4-9 | <=16Mb | IRIX 4.0.5 | Runs nicely. Reasonably fast response. |
| >=32Mb | IRIX 5.3 | Runs, but a bit sluggish. Will not support XFS (or OpenGL?) If the GUI is trimmed down a bit, response reportedly increases. | |
| IP12 | <=16Mb | IRIX 4.0.5 | Runs nicely. |
| >=32Mb | IRIX 5.3 | Runs nicely. |
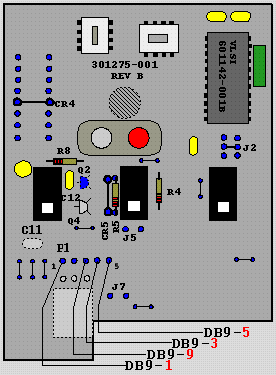
| SGI DB9 Pin | Signal | Description | Terminal DB25 Pin |
|---|---|---|---|
| 2 | TD | Transmit Data | 3 |
| 3 | RD | Receive Data | 2 |
| 4 | RTS | Request To Send | 8 |
| 5 | CTS | Clear to Send | 8 |
| 7 | SG | Signal Ground | 7 |
| 8 | DCD | Data Carrier Detect | 4 & 5 |
| 9 | DTR | Data Terminal Ready | 6 |
Note: The pinouts for the SGI 9-Pin serial connector are incompatible with the IBM 9-pin serial standard. You will need to wire up an adapter in order to use your pc as a terminal emulator for your SGI. Before you complain too loudly about SGI and incompatibility, you should realize that the SGI pinout is older than the IBM standard, and direct your complaints to IBM :-)
Yes, you can boot and install from CDROM on all the 4D series machines. Unfortunately, on some of the earlier machines in the series (such as the Professional Series and Personal IRIS 4D/20 and 4D/25) the PROM monitor is totally ignorant of how to handle a CDROM drive, so you need to treat it like a SCSI disk. For the rest of this chapter, we will assume that we are installing on a machine that does not support CDROM boot from the PROM monitor menu. For the sake of our discussion, we will assume that we are installing on a 4D/70 (although the procedure is virtually identical for any of the 4D series), that the CDROM drive has been installed via the procedures described in the SCSI HACKS section (if needed), the SCSI ID for the CDROM is set to 4, and you have already inserted the IRIX distribution CDROM in the drive (I recommend doing this before trying to access the CDROM from sash. Sometimes sash will get confused if it sees an empty CDROM drive.)
To boot up sash (Stand Alone SHell), enter the monitor's command mode and type:
boot dksc(0,4,8)sash.IP4
if this gives you an error, try replacing "sash.IP4" with "/", which is an invalid file name. This should cause the monitor to display the valid filenames on the partition. If "sash.IP4" is not present, then the CDROM that you are using is not bootable on a 4D/70. Versions that I know are bootable are 4.0.1, various flavors of 4.0.5 (A and F), 5.2 & 5.3. I recommend the use of 4.0.5 due to it's smaller memory requirements.
Once sash is up and running, you will have access to a limited number of unix-like shell commands, including ls, cp, etc. At this point, you will need to copy the miniroot from the CDROM to the swap partition of the target's hard-disk (let's say it's SCSI ID is 1). To do this, type:
cp -b 32k dksc(0,4,8)mr dksc(0,1,1)
This will produce a whole series of dots. When the copy is finished, you can boot the miniroot by typing:
dksc(0,1,1)unix
This should start the boot-up procedure, and bring up the miniroot and the standalone inst program.
single
For older systems, you'll have to do it manually. First, boot up sash by typing:
boot dksc(0,1,8)sash
Then set the initstate environment variable to "s" by typing:
setenv initstate s
And finish the boot process:
dksc(0,1,0)/unix
This should bring you up in single user mode. Change the root password by typing:
passwd root
You can then bring the system back down by typing:
init 0
Or, alternately, you can finish bringing it up to multiuser mode by typing:
init 2
Note that once you power the system off, the initstate variable is cleared, and the system will boot using the default init state defined in /etc/inittab
If your system came with a hard disk and it won't boot from the monitor menu, there is still a good chance that IRIX might be present and bootable. Your bootfile and root environment variables might simply have been trashed. For the sake of the discussion, let's assume we're talking about a SCSI disk set to address 1. First, see if SASH is on the disk. try typing:
boot dksc(0,1,8)sash
if sash is there, it should start loading. Once sash is loaded, you should be able to load IRIX (assuming it's still intact). At this point, you might want to try bringing IRIX up in single user mode so that you can examine the root filesystem, etc. You can force singe user mode by setting the initstate environment variable to "s". This is acomplished by typing:
setenv initstate s
You can then try to boot up IRIX by typing:
dksc(0,1,0)/unix
If none of this works, try taking a look at the disk partition structure with fx (booted from CDROM). The partition table should look something like the following:
| Partition | Format | Main Use | Contents |
|---|---|---|---|
| 0 | EFS | Boot Partition | IRIX Root Partition (mounted as /, the stand-alone utilities are in /stand). |
| 1 | rawdata | Swap Partition | IRIX miniroot (Immediately after CDROM installation ONLY), overwritten by swap data after first full IRIX boot. |
| 6 | EFS | Data partition | IRIX filespace partition (usually mounted as /usr) |
| 7 | EFS | Volume partition | This partition is usually mapped to the overlap every partition on the disk except the volume header partition |
| 8 | volhdr | Volume header | Must start at the first sector on the disk. The first sector contains the disk label. This sector is also duplicated in the first sector of every track in the first cylinder. A simple directory structure (which is understood by the PROM Monitor) is supported in this partition, and the directory's table of contents is also included in the disk label. The first file in the directory table is sgilabel which is usually followed by a bootable copy of sash. |
| 10 | entire | --- | Mapped to overlap the entire disk. |
dksc(0,4,7)/stand/fx.IP4
Fortunately, fx is a pretty complete menu-driven utility. The only oddity occurs if you select automatic disk installation using the standard defaults. In this mode, fx will re-format the hard drive, label it, and set up default partitions. For ESDI drives, this is just fine. For SCSI drives, however, it is not usually a good idea to re-format unless absolutely necessary. If you are trying to install a SCSI drive, I suggest you go through the menus manually, selecting the defaults for the partition and label commands. When you are done, you should write the changes to disk, reboot sash, and continue installing the miniroot. If this fails, go ahead and try the autoconfigure mode on the SCSI disk. What could it hurt at this point :-)
In order to create a bootable IRIX filesystem on a hard disk, you need a couple of things. First, you need access to fx, the IRIX disk formatting and partitioning utility. There are both standalone and IRIX versions of this utility. The standalone version is used when you have a copy of the IRIX installation media, and you wish to install a fresh new copy of IRIX on a virgin disk. The IRIX version can be used to format a 2nd hard drive from an up-and-running IRIX system.
Information on fx and other installation matters can be obtained from SGI via their on-line libary (you can find a pointer to this in the section on Pointers to other information sources), so I won't go into too much detail on this. What I want to concentrate on is the partition structures themselves. A typical IRIX bootable file system consists of the following partitions:
Lets take a look at the following partitions in detail. Rather than decribing the partitions in numberic order, we will describe them in the order in which they appear on the disk.
If, however, you are in that sorry group of hobbyists that did not receive a copy of the installation media, then you are well acquainted with that fearful feeling in the pit of you stomach (akin to rolling dice) that occurs every time you power your SGI off and on.
The problem is basically that of a lack of a miniroot to facilitate disk repair and restoration of savesets. When you install IRIX off of the installation media, inst copies the miniroot from the installation media to the swap partition of the target hard disk. This copy is usable until the installed version of IRIX is booted, at which time the miniroot is overwritten by swap data. Inst does not, unfortunately, store a bootable copy of the miniroot on the target hard disk for future use. In order to recover from a completely obliterated hard disk, You will need to boot the miniroot off of a copy of the installation media in order to reinstall the system or restore the complete hard disk saveset.
There are a couple of ways around this dilemma. First, you can use the PROM Monitor cp command to completely copy one hard disk to another, as long as the two hard disks are of identical manufacture. Second, you can make a complete saveset of the current root hard disk, and restore it to another hard disk (of equal or larger capacity) configured to a different SCSI id Unfortunately, both these approaches lead to the undesirable requirement of holding a relatively large (and otherwise useful) hard disk in reserve, solely as a backup boot disk.
After a little bit of experimentation, I think I may have come up with another alternative to this dilemma. I have attempted to create an ersatz miniroot from the IRIX files currently present on the root hard disk. Now, don't get too excited about this yet...;-) This ersatz miniroot is quite restricted in it's capabilities, and is completely unlike the miniroot provided on the installation media. What I have done is to create a shellscipt that copies a minimal single-user bootable IRIX filesystem to a small SCSI hard disk (~100 Mb). The shellscript performs the following functions:
The purpose of this ersatz miniroot is as follows; If the bootable kernel on your root disk is wiped out, you simply boot up off of the small hard disk and use tar, bru, or whatever to do a complete reinstall from your backup saveset. If the filesystem is really hosed, you can use fx to reinitialize the disk, dvhtool to rebuild the disk label partition directory, and then restore your system.
My original intent was to use a Zip disk for the bootable ersatz miniroot. This does indeed work on some platforms. Unfortunately, there are other platforms which do not seem to like using removable SCSI media as a boot target from the PROM Monitor. In either case, a small SCSI disk salvaged from an older Macintosh or Sun3 should be adequate and acceptable to the platforms that seem to be more picky as to their boot target. You will find more info on platform-dependent behavior in the README files included in the release.
To download the V1.0-Alpha version of ZipBootGen, Click Here.
!!!WARNING!!! Please note that I am releasing this shellscript in Alpha form. This means that it is only minimally debugged, and will most likely need extensive hacking. Also, the ersatz miniroot may not be fully functional in that critical dynamic libraries may still be missing. I have tried my best to include what I thought was necessary, but it is very likely that I may have forgotten something. If you decide to experiment with this approach, please drop me an email note with your results. I would prefer that only those in posession of installation media actually try to perform a complete backup using this initial Alpha release. I'd hate to have anyone wipe out their only copy of a viable system while experimenting with an untested backup procedure.
The PROM monitor commands and environment variables are documented in the various 4D Series Owners Guides. Since the 4D series machines are relatively old, and this document is for experimenters who are relatively poor, and are most likely trying to revive/restore a machine for which documentation has been either lost or trashed, I will summarize them below. Note that your particular machine may have some extra commands, such as passwording, etc. Use the help (or ?) command to determine the monitor capabilities of your particular machine.
There are a number of ways to bring up the PROM monitor. If you are not certain of the condition of the graphics system or video monitor, you can bring up the PROM monitor from a terminal on serial port 1. Simply disconnect the system keyboard, and the bootcode will default to the serial port (9600, N, 8, 1).
File names at the monitor level follow unix standards, with the exception that the file name must be less than 20 characters. Device names are specified differently in the monitor than they are in IRIX. The following list describes the devices supported by the monitor. The general format is:
| IRIS Monitor | IRIX Equivalent | Descriptiopn |
|---|---|---|
| dkip(#,#,#) | ips#d#s# | ESDI disk controller |
| dksc(#,#,#) | dks#d#s# | SCSI disk controller |
| tpsc(#,#,#) | tps#d#s# | SCSI tape controller |
| xyl(#,#,#) | xyl#d#s# | SMD disk controller |
| tpqic | ??? | 1/4" Tape drive (QIC02) |
| tty | --- | CPU Board duart |
| tty(#) | --- | Serial port 1 or 2 |
| gfx(0) | --- | Graphics System/Keyboard |
| console | --- | Default console, which is set by enable command |
| bootp | --- | Ethernet controller, supports either BOOTP or TFTP protocols |
Note that there are 3 arguments to most of the disk device names. For Example, if we wanted to specify ESDI controller #0, device #1, partition #2, we would use the following:
| Monitor/SASH | IRIX |
|---|---|
| dkip(0,1,2) | ips0d1s2 |
Important note: On SGI systems, the SCSI disk controller (and tape controller?) ID is 0. This is a SGI peculiarity. This limits the number of usable SCSI IDs to 1-7.
| Variable | Description |
|---|---|
| netaddr | Network IP address for booting across the net. (e.g. 200.10.20.30) |
| dbaud | Diagnostics console baud rate (75 to 19,200 Baud.) |
| rbaud | Remote console baud rate. |
| bootfile | Name of file used by the autoboot command. |
| bootmode | Selects the bootmode on init/
powerup. Possible values are:
|
| console | Selects boot console. Possible
values are:
|
| root | Selects disk with root file system. Note that this is in IRIX notation, i.e. a device name such as dks0d1s0. |
| keybd | Specifies the type of keyboard. The default is "df". |
| Variable | Description |
|---|---|
| showconfig | Tells IRIX to print extra info as it boots. To enable, set to "istrue". |
| initstate | Overrides the initdefault value in /etc/inittab. Possible values are: S, 1, 2, 3, 4, 5 and 6. |
| swap | Specifies the swap partition to use. If left unset, the default swap partition is 1 on the device specified by the "root" variable. |
| verbose | Be excessively wordy when complaining about errors. |
The following list contains what I have gleaned from ongoing Usenet traffic. If you find an error, or have information not listed here, please drop me an email note and I will include it.
| Base Model | 4D/50 |
|---|---|
| Introduced | No info available yet... |
| Enclosure | Professional Series Twin Tower |
| CPU | No info available yet... |
| Memory | No info available yet... |
| Performance | No info available yet... |
| Graphics | No info available yet... |
| Software | No info available yet... |
| Notes | If anyone has the specs for this (or other) SGI systems, let me know and I will include them... |
| Base Model | 4D/60 |
| Introduced | Announced March 1987 Replaced by 4D/70 in Fall/Winter 1987/1988 |
| Enclosure | Professional Series Twin Tower |
| CPU | MIPS R2000 (8 MHz) system with separate MIPS R2360 FPA board. |
| Memory | Separate 4Mb memory boards (up to 3 per system for max of 12 MB CPU memory) |
| Performance | 0.72 MFLOPS (double precision) 7.0 MIPS |
| Graphics | "B", "G" |
| Software | System Software based on System V.3. |
| Notes | This information was gleaned from usenet posts. I have never actually seen this configuration (or an IP4 family "multicard" CPU???), but the original poster seems to have had his act together, so here it is...:-) |
| Base Model | 4D/70 |
| Introduced | Announced November 1987 Replaced by 4D/80 ??? |
| Enclosure | Professional Series Twin Tower |
| CPU | (IP4)MIPS R2000 (12.5 MHz) with integrated MIPS R2010 FPA on board. |
| Memory | Integrated CPU memory on board (8 - 16 Mb), Standard 30-pin 9-chip SIMMS. See the section on Memory Requirements for a possible exception to this memory limitation. |
| Performance | 1.1 MFLOPS (double precision) 10.0 MIPS |
| Graphics | "B", "G", "T", "GT", "GTX" |
| Software | IRIX 4.0.5 Recommended because of 16 Mb Memory limitation. The "GT" and higher graphics configurations Will supposedly run up to IRIX 5.3, but won't support XFS (or OpenGL?). |
| Base Model | 4D/80 |
| Introduced | Announced ??? |
| Enclosure | Professional Series Twin Tower |
| CPU | (IP4.5)MIPS R2000 (16 MHz) with integrated MIPS R2010 FPA on board. |
| Memory | Integrated CPU memory on board (8 - 16 Mb), Standard 30-pin 9-chip SIMMS. Memory was expandable beyond 16 Mb by use of a companion VME card in the next slot which connected to the IP4.5 via an external bus jumper plug. |
| Performance | ?? MFLOPS (double precision) ?? MIPS |
| Graphics | "B", "G", "T", "GT", "GTX" |
| Software | IRIX 4.0.5 Recommended because of 16 Mb Memory limitation, unless you are lucky enough to have the VME memory expansion card! "GT" and higher graphics configurations will supposedly run up to IRIX 5.3. Don't know yet about XFS or OpenGL, but my guess is that the same restrictions that apply to a 4D/70 apply to this machine. |
| Base Model | 4D/85 |
| Introduced | Announced ??? |
| Enclosure | Single tower enclosure, similar to that of the Crimson. |
| CPU | (IP4.5)MIPS R2000 (16 MHz) with integrated MIPS R2010 FPA on board. |
| Memory | Integrated CPU memory on board (8 - 16 Mb), Standard 30-pin 9-chip SIMMS. Memory was expandable beyond 16 Mb by use of a companion VME card in the next slot which connected to the IP4.5 via an external bus jumper plug. |
| Performance | ?? MFLOPS (double precision) ?? MIPS |
| Graphics | "B", "G", "T", "GT", "GTX" |
| Software | IRIX 4.0.5 Recommended because of 16 Mb Memory limitation, unless you are lucky enough to have the VME memory expansion card! "GT" and higher graphics configurations will supposedly run up to IRIX 5.3. Don't know yet about XFS or OpenGL, but my guess is that the same restrictions that apply to a 4D/70 apply to this machine. |
| Notes | Aside from the nicer enclosure and it's ability to use power-series style hard drive caddies, it is essentially a 4D/80 in performance. I have also heard that some twin-towers were badged as 4D/85's. I have only seen, and can confirm, the single tower species! |
I have noticed that the graphics subsystems seem to be interchangeable across the 4D/50-85 family. This would imply that it should be possible to "mix and match", although I haven't tried it with anything except the "G and "GT" cardsets. Also, it appears that the color of the top and decorative trim panels of this series reflected a "color code" that can be used to quickly identify the graphics engine in that system.
| Graphics | ||
|---|---|---|
| Graphics modes | Unknown ??? | |
| Color | Unknown ??? | |
| Cardset | Unknown ??? | |
| Resolution | Unknown ??? | |
| Performance | I have only run across one or two references to this configuration...It might be simply be the "server" configuration (i.e. no graphics) | |
| Software | Unknown ??? | |
| Graphics | ||
| Graphics modes | Unknown ??? | |
| Color | Purple Top | -- |
| Cardset | GF3, TB2, ZB2, DE3 (Seems to be identical to "G" ???) | |
| Resolution | 1280x1024 screen resolution. | |
| Performance | I can only assume that the performance is identical to that of a "G" system. Apparently, the T designation originally implied "Turbo". This designation was dropped (around 1988?) in favor of the "G" designation. | |
| Software | Probabily the same as "G" | |
| Graphics | ||
| Graphics modes | Unknown ??? | |
| Color | Purple Top | -- |
| Cardset | GF3, TB2, ZB2, DE3 | |
| Resolution | 1280x1024 screen resolution. | |
| Performance | 8 - 24 bit color + 4 bits overlay/underlay + 24 bit z-buffer. 5500 gouraud shaded, z-buffered polys per second. Apparently, the Z-buffer was considered an option, and may not be present in all systems. | |
| Software | Software support seems to stop somewhere before IRIX 5.3. Known to work with IRIX 4.0.5 | |
| Graphics | ||
| Graphics modes | 30HZ, 60HZ, NTSC, PAL, and 30HZ_SG. | |
| Color | Green Top | -- |
| Cardset | GE4, GM1, RM1, RV1, RM1 | |
| Resolution | 1280x1024 screen resolution. | |
| Performance | 8 - 24 bit color + 4 bit overlay/underlay + 24 bit z-buffer. 60,000 gouraud shaded, z-buffered polys per second. Note that there seem to be two versions of this cardset. One version supports Alpha planes, the other doesn't (See the card list in the appendix.) It might also be possible to replace the RV1 cards with RV2 to allow for stereo video and 343 mode. The GT supports Alpha planes and the GTB does not. 1280x1024 screen resolution. | |
| Software | Supported through IRIX 5.3 | |
| Graphics | ||
| Graphics modes | 30HZ, 60HZ, NTSC, PAL, 30HZ_SG (343 and STR_RECT with the RV2 cardset.) | |
| Color | Red Top | -- |
| Cardset | GM2, GE4, RM1, (RV1.5 or RV2) | |
| Resolution | 1280x1024 screen resolution. | |
| Performance | Unknown planes... (probably same as GT) 100,000 gouraud shaded, z-buffered polys per second. Note that there appears to be 2 versions of this cardset. The GTX supports Alpha planes, and the GTXB does not. The RV2 cardset allows for stereo video and 343 mode. | |
| Software | Supported through IRIX 5.3 | |
| Notes: | Although I have seen this configuration mentioned in the SGI archives, I have my doubts as to it's usage with the professional series. It would require a different backplane since the GM2 uses a non-VME style connector. |
Another interesting thing to note is that the IRIX man page serial indicates that a Stereo Field Sync signal is available from pin 3 of the DIN-8 powered serial port (a Professional/Power Series option.) I haven't come across any further reference to this signal. It might be intended for use with LCD shutter glasses, but your guess is as good as mine! If anyone has any further info, drop me an email note and I'll include it here.
Note that the 4D series require 20 amp service. Ahem. Of course, if you don't really load it up with lots of option cards, 4 Full Height hard disks, 2 tape drives, etc. you might be able to get away with swapping the 20 Amp plug for a plain old 15 Amp plug, and connecting it to a standard wall outlet (for testing purposes only!). Do try to place it on a circuit that is carrying a minimal load (cut off the circuit breaker for the selected outlet, see what other outlets/lamps die, etc. and try to move those other loads to a different circuit.) Note that the system has a built-in 16 amp circuit breaker, which will be of little protective use if you use this approach on a 15 amp wall outlet. If you intend to keep the 4D up continuously, you should run a separate 20 amp circuit for it.
!!!PLEASE NOTE!!!, I am not _recommending_ that you do this! In a home with inadequate wiring, this approach can be a fire hazard! I do not want to have people chasing me around with axes because their house burned down. I accept NO liability for any damage you may incur to yourself, your home or your system! You have been warned! I STRONGLY recommend that you have a certified electrician install a building code compliant 20-amp receptacle.
The following notes apply only to the Professional series twin-tower enclosures. The Power series are similar, however I believe that they use a different power supply and cooling system. There may also be differences in the SCSI cabling system used in the smaller drive tower.
The 4D/70 and other of it's ilk (Professional series twin tower cardcages) use an interlock system to shut down the power if a panel is open. This can sometimes be a pain in the posterior when troubleshooting. The interlock system consists of 3 door switches and a 1 amp breaker ganged to the 16 amp main breaker on the back panel of power-module (at the base of the drive tower.) Two of the switches are located at the top of the main tower near the threaded mount that the door thumb-screw screws into. When the thumb-screw is fully engaged, it's tip depresses the interlock switch opening it. These two switches are obvious to anyone who examines the system superficially. The third switch is hidden insidiously inside the power-module on the right-hand side. It is operated via a mechanical linkage through each of the stacked drive/tape modules, and is depressed only when the top vanity cover of the drive tower is in place. All three switches seem to be wired in parallel, and operate by shorting a voltage through the 1-amp circuit breaker, which throws both circuit breakers open. To disable the interlocks, simply pull off one of the two switch-wires (they use press-on spade connectors) at the switch you wish to disable. To get to the switch in the drive tower, you'll have to remove the power module cover. I suggest you cover the wire you pull off with electrical tape. I also strongly suggest that you re-connect the interlocks when you are done troubleshooting. I'm only guessing, but I think part of the reason they are there is to insure that the front and rear panels of the main tower are in place during operation. This probably has a significant effect on the flow of cooling air over the cardset. My guess is that prolonged operation with either of the panels open could lead to card/component overheating and failure!.
Incidentally, a number of people sent me warnings about the two squirrel-cage fans in the base of the main tower. Apparently, these are in the habit of failing on a random basis. Failure of just one of the fans can lead to overheating and card/component failure! Check to insure that both fans are operating! Mine seem to be fine, so I haven't developed a service/replacement hack for 'em yet.
I have run across 3 different CPU cards for the 4D/(50-80) series of machines. These consist of a 8 Mhz IP4 (030-0121-001) used in the 4D/50, a 12 Mhz IP4 (030-0011-001) used in the 4D/70, and a 16 Mhz IP4.5 (030-0122-007) used in the 4D/80. A lot of the net messages I received, as well as the SGI Hardware FAQ, indicated that SGI systems need SGI-specific SIMMS. I have not observed this for the three CPU cards mentioned above. I have no doubt that it is true for other 4D series machines such as the 4D(30-35). The IP4 series of CPU cards seem to be much more forgiving than their faster and newer brethren, however. I have successfully used plain old PC type simms in all three CPU cards. These were 1 Mb 9-chip 30-pin simms (parity, 100 ns or faster.) I have even used simms from a Sun 3/80 (sacrilege!). I can not say that _all_ 9-chip simms will work, but I have had good luck with all the various ones that I have tested. The simms supplied by SGI seem to be of Toshiba manufacture, so if you are concerned, stick to those. But before you go out and spend wads on that SGI-specific memory, try pirating a few simms from that old PC you've been using as a door-stop the past two years. If they work, send me a beer. Note that I have _not_ tried 3-chip simms. Some of these have refresh address requirements which are different than those of the 9-chip variety, so I doubt they will work.
For testing purposes, you can bring the system up with only 8 Mb of memory. Simply populate every other pair of simm slots (i.e. 2 in, 2 out, 2 in, 2 out, etc.)
A number of sources indicate the the Professional series could make use of SGI-proprietary VME memory expansion cards in order to expand the IP4 beyond it's normal 16 Mb limit. An examination of the Professional series backplane reveals the interesting fact that the VME P2 connector provides a small bussed segment across VME slots 1-4. If I were a bettin' man, I'd bet that the P2 connector on the VME backplane is used as a memory expansion bus by the IP4. Another interesting observation is that the IP4.5 has a large bus-type connector on the front of the card which is not found on an IP4. It seems that the IP4.5 made use of this connector (in conjunction with? ... in place of ?) the P2 bus to provide for memory expansion. As I have never run across a VME memory expansion card for either CPU card, and documentation for this feature seems to be as scarce as hen's teeth, I can't really elaborate any further about it. If anyone has any information on the VME memory expansion capabilities of either CPU card, or what VME memory cards would work with either CPU, please drop me an email note!
Recently, for lack of something better to do (Yeh, I know, I should get a life :-), I dragged out the ole' DVM and did some random circuit tracing on an IP4 card. One of the things I looked at was the (supposedly unused) 4 Mb MSB going to the SIMM array (I was having vague and idealistic dreams about hacking the board to handle 4-Mb SIMMS.) To my complete surprise, it appeared that the 4-Mb SIMM MSB was already routed by way of a buffer to some select logic. Could it be that the card could already handle 4-Mb SIMMS? Unfortunately, I have never gotten around to testing this. Will it work? I don't know at this time, but if someone else happens to have some spare 4-Mb SIMMS, and wants to try this out, let me know the results and I'll include them here. A recent version of the SGI Hardware FAQ actually mentions that some versions of the IP4 could handle 4-Mb SIMMS, with a max capacity of 64 Mb on board. It also mentions that the IP4.5 could support 4-Mb SIMMS by changing 2 PALS. I tried to pursue this, but was told by an SGI source that, although this is probably true, SGI never actually produced the 2 updated PALS. If anyone knows more about this, let me know.
| Slot | Card | Description | BG(1-4) | IACK | P1 abc | P2 b | P2 ac | P3 abc |
|---|---|---|---|---|---|---|---|---|
| 1 | IP4 | CPU/Memory | out | out | || | || | || | = |
| 2 | in | in | || | || | || | = | ||
| 3 | ESDI | ESDI Disk Controller | out | out | || | || | || | = |
| 4 | in | in | || | || | || | = | ||
| || | || | |||||||
| 5 | in | in | || | || | ~ | = | ||
| 6 | ENET | Ethernet Interface | out | out | || | || | ~ | = |
| 7 | in | in | || | || | ~ | = | ||
| || | || | |||||||
| 8 | GE4 | Geometry Engine | in | in | || | || | || | || |
| 9 | GM1 | Graphics Manager | out | out | || | || | || | || |
| 10 | RM1 | Raster Memory | out | out | || | || | || | || |
| 11 | RV1 | Raster Video | out | out | || | || | || | || |
| 12 | RM1 | Raster Memory | out | out | || | || | || | || |
Key:
| ||||||||
The Professional IRIS backplane seems to be divided into 3 logical segments, a CPU segment (slots 1-4), a CPU/VME segment (slots 5-7) and a Graphics segment(slots 8-12.) Note that the P2ac portion of the backplane does not extend across the 3 segments, but is divided into 2 separate busses, P2ac(CPU) and P2ac(GRAPHIC). The P2b portion of the P2 connector does extend across all 3 segments of the backplane.
The rule of thumb for most VME systems is to install backplane jumpers in unused slots. The only exception to this rule for the 4D appears to be for the GE4 card.
Note that the P1 connector is bussed across all three segments of the VME cardcage. The P3 connector on the IP4 CPU card (which must reside in slot 0) is used to provide a connection to the local SCSI bus and 4D control panel. On the Graphics segment of the backplane, the P3 connector is bussed.
The keyboard is documented quite thoroughly in the SGI man pages. Of course, if you don't have your SGI up and running yet, that won't quite help :-) For expediency, I will summarize the keyboard interface below:
The Professional and power series machines use a DB15 connector for their keyboards. The mouse daisy-chains off the keyboard. The pinout is as follows (with thanks to the SGI man pages!):
| Pin | Signal | Description |
|---|---|---|
| 1 | GND | Ground |
| 2 | GND | Ground |
| 3 | GND | Ground |
| 4 | KTXD | Keyboard Transmit |
| 5 | KRDC | Keyboard Receive |
| 7 | +12 Vdc | Power |
| 8 | +12 Vdc | Power |
| 9 | +12 Vdc | Power |
| 10 | MTXD | Mouse Transmit |
| 15 | -12 Vdc | Power |
The data stream format is as follows:
On the Power and Professional series, The mouse interface is electrically compatible with the RS-423 specification. The mouse connects to the keyboard via a 9-pin DB9 connector. The pinout for this connector is documented in the table below.
| Pin | Signal | Description |
|---|---|---|
| 1 | +5Vdc | Power |
| 3 | -5Vdc | Power |
| 5 | MTXD | Mouse Xmit Data |
| 9 | GND | Ground |
The data stream format is as follows:
Note that the data format is identical to the PC-compatible Mouse Systems format.
Internal examination of a real (borrowed) SGI professional-series optical mouse revealed a very interesting fact. The innards (plus or minus a few discrete components) were identical to that of the older Sun M4 optical mouse used on Sun-3 series systems. This mouse can be identified by the MSC part number 901589-001/C on the bottom label. For quick identification (when sorting through a box of orphan mice at a fleamarket) look for a mouse with a cable terminated with a modified RJ11 (telephone-type) connector. Sun modified the connector by adding 2 brass alignment pins to it's sides.
The Sun3 M4 mouse transmits data conforming to the Mouse Systems format. The only real differences between the SGI optical 9-pin mouse and the Sun3 mouse consist of baud-rate (The Sun3 mouse operates at 1200 baud, whereas the SGI mouse uses 4800 baud) and electrical interface (the Sun3 mouse requres only +5Vdc, and provides a 0-5 Volt data signal swing. The SGI mouse, on the other hand, uses a bipolar supply, and provides a bipolar data swing.)
Upon opening the Sun-3 mouse, you should be able to find the numbers 301276-001 Rev B silkscreened on the pc board somewhere near the center screw hole mount. Be aware that there is also a newer Sun M4 mouse that is used on Sun 3/80 and Sun-4 systems. This mouse can be identified by it's use of a mini-din connector. Unfortunately, the Sun-4 mouse uses a different PC board, and won't work in this application.
The following modifications will convert a Sun-3 series mouse to an SGI Professional series compatible mouse. If you have problems after the modification, you may need to try experimenting with different optical mouse pads. The one I converted worked fine, but I needed to add some extra light-baffling to isolate the X and Y sensors (I used a piece of black electrical tape.)
| Original | Modified |
|---|---|
 |
 |
The Following modifications will convert a Sun-3 mouse to an SGI-compatible mouse:
Although the 4D/50-80 (Professional twin-tower series) does not include an external SCSI connector like the power series, it is relatively simple to hack one in. the SCSI bus is accessible via each drive module on the smaller tower. I simply disassembled a drive module and fabricated a new backplate with a standard IDC Centronix-style SCSI connector (mounted diagonally, in order to fit on the plate.) Simply connect this via a short piece of ribbon cable to the internal SCSI connector. It is important that this module remain the last one in the SCSI cable chain, i.e. it must be the top module. In addition, you need to install a SCSI termination plug on the connector (and disable whatever termination was being provided by the last device previously in the chain) in order to terminate the SCSI chain properly. This modification will allow you to connect an external SCSI CDROM or tape drive.
Before I begin this section, a few words of caution: If you don't feel comfortable troubleshooting high-amperage switching supplies, don't try!!! Have a qualified service technician do the repair. You could very easily injure yourself and/or your system, and start a fire to boot! you have been warned!!! I will not be held liable for the consequences! Proceed at your own risk!!!
I have run across bad supplies in 3 of the 4 systems I have access to (These are Professional series twin-tower systems. I don't know think the '85 or the Power series twin-tower systems use the same supply.) All the supplies failed in the same manner, which could indicate a long-term failure mode with this particular power supply(or just my bad luck :-)
This was a @#$% problem to diagnose! The CPU and logic in both systems seemed fine, but neither would format or access a hard disk without horrible errors. Of course, the first thing I did was put a DMM on the 12v and 5v supply lines, which both looked fine! I then tried both ESDI and SCSI hard disks, and both acted as if they were bad! Finally, in desperation, I put the SCSI disk in a separate powered enclosure, and it worked like a charm! Grumbling to myself, I dragged out the old O'scope, and sure enough, both the 5V and 12V lines looked like an EKG trace! On the 5V side, spikes as low as 4.5V and as high as 5.3V appeared. A DMM could not detect this crud.
I pulled the supply. This is a nice blue box made by LH Research, model # MMA44-E192B, which puts out about 5V @200A (Screwdriver-melting stuff! be careful if you try this!) After opening it up, I found a bad electrolytic, one of a pair joined by a plastic plate across the top (2900 Uf @ 200VDC, 250V Surge). Note the this pair is somewhere in the input side of the supply, not on the output as you might suspect.
As I said previously, I had 3 systems that have failed in exactly the same manner. All three used LH Research power supplies. I pulled one good electrolytic from one of the other supplies and used it to replace the bad one in the supply I was working on. Voila! A working supply! no disk errors!.
I called the nice lady at LH Research to see if I could purchase a replacement electrolytic. They cost about $40.00 each, but the kicker is the lead time, which is about 6 months! Apparently we are in the middle of a high-voltage electrolytic shortage :-) If this turns out to be your problem, you might be able to lean on her a bit harder than I did, though. (Note that this is being written in Sept '95. The situation at the current time might have improved.)
I recently received a message from a fellow net resident asking about a problem he had with his 4D/70 IRIX system clock. Apparently, his IRIX software system clock was being reset to zero every time he rebooted. The question prompted me to investigate my own system a bit further, revealing a potential failure mode for these dinosaurs. Anyone who has ever played with Sun hardware (perish the thought! :-) will recognize this problem, as it is quite common in some of the older Sun3 and Sun4 series systems.
Even though I'm not privy to the internals of IRIX, I don't believe it's a stretch of the imagination to assume that IRIX initializes it's software system clock from the hardware real time clock (RTC) on board the IP4 or IP4.5. On these CPU cards, the RTC is implemented with a Dallas Semiconductor DS1216 (or DS1216B) SmartWatch. The SmartWatch is a 28-pin DIP socket with a built-in RTC chip and lithium back-up battery. A Static RAM chip is plugged into the SmartWatch, and the SmartWatch/RAM assembly is then plugged into a 28-pin DIP socket on the CPU card. The SmartWatch is designed to supply back-up power to both it's internal clock chip and the piggybacked static RAM chip. While this is a neat idea, there will invariably come a time when the built-in lithium cell becomes exausted. When this happens, the built-in clock will begin to act flaky, and the static RAM chip (used to store the monitor-rom nvram enviroment variables) will become unreliable in that it's contents may become scrambled when the system is powered down. How long will the lithium cell last? The manufacturer's data sheet indicates a nominal lifetime of greater than 10 years. Now the discouraging part... the date code on the SmartWatch in my system is '85. (I guess this means that my system is living on "borrowed time" :-)
Fortunately, unlike Sun hardware, SGI does not keep it's system ethernet MAC address in nvram on the Professional series machines, so a nvram failure is not quite as devastating on a 4D/70 as it would be on a Sun3 or Sun4. I would, however, recommend keeping a paper copy of the contents of your nvram (use the printenv monitor command) in case a powerdown leaves you stranded. The Professional series monitor will recognize a corrupted nvram and will still allow you to enter monitor mode and correct the contents.
If I locate a source for the SmartWatch modules, I'll include a reference to it here. If no source is available, it might be possible to attack the SmartWatch module with an Xacto knife and mini-soldering iron and kludge in a replacement battery. When or if I try this, I'll update this chapter to include the modifications.
Well, I have some good news, and some bad news. The good news is that for one specific case, hot-clocking the IP4 works well. The bad news is that you probably aren't using this particular version of the CPU. The results with the 12 Mhz IP4 were particularly disappointing, since it appears that some versions of this board are capable of using 4Mb SIMMS. If this board were capable of 16 Mhz, it could be preferable to an IP4.5, which requires a memory expansion card (verrry hard to find!) in order to exceed 16 Mb of memory.
The CPU oscillator is the oscillator closest to the RTC module. It's frequency should be twice that of the actual CPU frequency.
I have tried hot-clocking 2 versions of the IP4, and also played with an IP4.5. The results were as follows:
Here is the good news! Don't throw away those old 8 Mhz 4D/50 IP4 CPUs! All that seems to be needed in order to get one of these up to 12 Mhz (the clock rate of an IP4 in a 4D/70) is a simple Xtal Oscillator swap. I have seen no ill effects in the system I have converted.
Here the picture is much more gloomy. I have tried to boost this to 16 Mhz, in the hope that I could get performance equivalent to an IP4.5. No go... I'm not quite certain what is causing the problem, but more than a mere Xtal osc. change is needed. Unfortunately, my supply of Xtal oscillators is limited, and I was unable to test any values between 12 and 16 Mhz. As far as differences between the IP4 and IP4.5, the only noticeable one appears to be the speed the the CACHE chips. The same chips are used in both boards, but the IP4 chips appear to be 15 ns, and the IP4.5 appear to be 10 ns. I don't believe this is the cause of the problem however, since total removal of the CACHE chips followed by a subsequent attempt to boot (at 12 Mhz) leads to a failure of the power-up self test, which is reported correctly via a diagnostic terminal on serial port 1. It is possible that a frequency somewhere between 12 and 16 Mhz might work... if anyone out there tries it, let me know your results, and I'll include them here.
The results here were a bit more ambiguous. I managed to get this CPU board operating as fast as 18 Mhz without any initial problems. One problem did crop up later, however. A short time after the mod, I tried to power up/boot the system (which I had been able to do successfully quite a number of times since the Xtal swap). Unfortunately, the system hung on boot-up. Power cycling did not help, and the CPU card remained in a hung state. I finally made a last-ditch feverish white-knuckled attempt restore functionality by removing the NVRAM chip, in the hopes that it's select control or contents had glitched somehow. This worked! the system booted without a problem. I did have to re-initialize the NVRAM, however. This leads me to believe that the memory-access cycle timing for the NVRAM is on the hairy edge at 18 Mhz, and it must be possible to glitch the chip in such a manner that it locks up. As a result of this hair-raising experience, I dropped my system back down to 16 Mhz, and have not had a recurrence of the problem. It is conceivable that one could replace the NVRAM with a newer version (with a possibly faster access time), but I haven't looked into it yet.
What's that, you say? Audio? On a 4D/50-85 or Power Series Machine? No Way! ...Well actually, Both the 4D/50-85 series and the Power Series do have some rudimentary audio capability. Unfortunately, it seems that this capability has never been documented or exploited. I'll give you a brief rundown of what I've discovered, and let you be the judge as to it's usefulness.
The IP4 and IP4.5 have a small audio section consisting of a Philips SAA1099 Stereo Sound Generator and 2 LM386 Audio Amps. Note that the Philips chip has no DSP capabilities. It is simply a sound generator. Don't expect to do anything complicated with it. As sound generators go, it's actually not that shabby. It supports the following:
The output from the audio section is provided by two 1/8" audio jacks on the IP4. The IP4.5, on the other hand, uses a 4-pin connector. Both are located on the upper back-edge of the board (as seen from the back of the cardcage.)
For some unknown reason SGI never documented this capability, or provided a software driver for it's use. If one examines the include file for the IP4 cpu (/usr/include/sys/IP4.h), you will find the following definitions:
	   #define SOUND_DAT_ADDR  0xbf60000   /* SAA1099 stereo sound generator */

	   #define SOUND_CMD_ADDR  0xbf600010
Also, under (/usr/include/sys/clover2.h), you will find the following definitions under defines for the IO2 board:
	   #define SOUND_DAT_ADDR  0xb7f00000  /* SAA1099 stereo sound generator */

	   #define SOUND_CMD_ADDR  0xb7f00010
The IO2 board is a single port IO board for the 4D power series. After physically examining an IO3 card, I can definitely say that the chip is present on this card also.
Well, now that we know about it, how do we use it? As far as I have been able to determine, no one has developed any driver code to access this chip. Part of the reason for this may be lack of documentation on the chip itself. Hopefully, I can remedy this. I have been able to locate the register definitions for the SAA1099, and have included a summary of them in appendix B. Unfortunately, as of this writing, I have not had the chance to try my hand at writing a driver. If anyone out there cares to give this a try, let me know and I'll include a pointer to your code here.
I have assembled the following debugging tips by generating "fake" failures (i.e. removing chips, memory, etc.) This map has already helped me to repair a bad IP4 with a blown DUART. If you happen across any other debugging tips, please let me know. I'll include them in this section.
The following LED codes refer to the LED single-digit display on the power-supply control panel, located at the bottom-front of the I/0 (smaller) tower.
| Symptoms | No activity on serial port 1 or graphics monitor. |
|---|---|
| LED Code | F |
| Diagnostic Actions | If the LED display never gets beyond the initial "F", something serious has happened. Check the RTC/RAM module, the CPU XTAL Osc., your EPROM (four 8Kx8 25C512's), etc. Note the the RTC module uses a 2Kx8 static RAM (replaceable with a 150 ns Hitachi HM6116 or equiv.) |
| Symptoms | No activity on serial port 1 or graphics monitor. |
| LED Code | 1 |
| Diagnostic Actions | The system LED cycles once through "F","B", ...etc... but halts with a "1" display. One possible cause is a bad DUART at location (F7N8) on the IP4 (This is the "middle" DUART). This is a Signetics SCN2681AC1N40 40-pin DUART. Apparently this DUART is critical to system operation. As a test, try exchanging it with the other 40-pin DUART, which doesn't seem to be quite as critical. If serial port 1 comes alive and the PROM monitor wakes up, then the DUART is bad. If not, check the Xtal oscillator for the DUARTs and the other glue logic around them. |
| Symptoms | PROM monitor comes up on serial port 1, but hangs during the local hardware initialization phase. Graphics monitor remains dead. |
| LED Code | LED code cycles extremely fast (almost "wildly") from " 1"to " 9". |
| "Diagnostic Actions | Try checking the 24-pin DUART (SCN2681AC1N24, IP4 location F2N8). |
Note: If anyone has any "real" documentation as to what the LED codes actually indicate, or any other tips on debugging one of these critters, drop me an email note with the details and I'll include them here.
If you examine the front panel on a twin-tower machine, you will notice an 8 position DIP switch. This switch enables the power-on diagnostic routines. You must have switches 3 or 7 closed in order to enable power-on diagnostics.
Recently, a fellow hobbyist emailed me a list of the actual single-digit LED code meanings for the professional series. Note that the display cycles through the tests listed below, hence some codes have duplicate meanings depending on where they occur in the power-up test cycle. There also seems to be a correspondence with each of the tests and the LED array found on the edge of the IP4 and IP4.5 CPU cards.
Unfortunately, I have not yet been able to determine just how every
LED array code corresponds to it's single-digit LED code (They
flash by too #$%@$ fast, even with two people watching... As a last ditch
attempt I tried slowing the CPU clock down to 1 Mhz in the hope that we
would be able to catch 'em. No dice. If anyone knows these codes, drop
me an email note and I'll complete the table below.
(Note: This
would be useful to know, since single-tower machines don't have
a single-digit LED display on the front panel.)
| Single-digit | LED Array | Power-On Test | |||||
|---|---|---|---|---|---|---|---|
| LED Code | 5 | 4 | 3 | 2 | 1 | 0 | Executed |
| B | 1 | 1 | 0 | 1 | 1 | 0 | Memory Address Pattern Test |
| B | 1 | 1 | 1 | 0 | 1 | 0 | Initialize Local Hardware |
| B | 0 | 0 | 1 | 1 | 0 | 1 | Sizing and Clearing Memory |
| D | Parity Test | ||||||
| 5 | Data & Instruction Cache | ||||||
| 6 | CPU Address Translation | ||||||
| 8 | VME Bus | ||||||
| D | Non Volatile Memory | ||||||
| 0 | 1 | 0 | 0 | 0 | 0 | 0 | Timer & Clocks |
| 1 | Duarts/Serial Ports | ||||||
| 5 | Local I/O Interrupt | ||||||
| 6 | FPU Test | ||||||
| 7 | SCSI Test | ||||||
| 8 | SysID PROM/Sound Chip | ||||||
| D | 1 | 1 | 1 | 0 | 1 | 1 | Initialization |
| E | Initialization | ||||||
Buried deep within the GT graphics subsystem is a little-known interface which resides on the GM1 card. The GM1 appears to be built around a MC68020 CPU running at 16 Mhz. If you examine the card, you will notice a female DB9 connector. This connector provides an RS232C serial interface (9600,N,8,1) with more or less the same pinout as the standard SGI DB9 Serial connector. The only difference is that this serial interface doesn't support any of the hardware handshaking lines, so you can get away with simply connecting pins 2,3 and 7 via an appropriate adaptor cable (or you can use the same type of adaptor cable needed to connect an ASCII terminal to serial port 1 for debugging purposes. See the chapter on 4D Series Serial Port Pinouts for more details.)
If you connect this interface to an ASCII terminal, you will observe an interesting series of events. Upon hardware reset, the GM1 card will proceed through a series of power-up self tests, displaying the results on the terminal. The card will then display a monitor prompt ("gm>") and wait for input. If you type either "?" or "help", it will list a series of commands which will allow you to do the following:
As 680x0 monitors go, this isn't bad! This monitor was apparently intended for field service debugging of the graphics subsystem. Unfortunately, without more detailed documentation on the GT graphics subsystem (such as overall GT architecture documentation, a physical memory map, card interface specifications, etc.) the utility of this monitor is limited. The power-on self tests might still be of use, as they will probabily allow you to diagnose GM1 on-board problems (or rule out the GM1 board as a the failure point.)
If you look in /usr/include/sys/gtx.h, you will discover that the GM1 acts as the gateway into the graphics subsystem. As far as I have been able to determine, the MIPS based CPU board apparently communicates with the graphics subsystem by submitting buffered requests through a shared memory interface managed by the GM1. I find it interesting that the basic architecture of the entire SGI 4D seems to be that of a MIPS based system wrapped around a MC68020 based graphics subsystem. Perhaps there is some evolutionary history to the development of this architecture, based on previous IRIS 3000 design experience? Since I don't have an IRIS 3000 to perform a design comparison on, this all is mere speculation, but it is interesting nonetheless :-)
If anyone has more detailed information on the G, GT, GTX or other graphics architectures, board diagnostic/repair/substitution guidelines or common failure modes (i.e. the pinstriped screen of death failure on the G and GT :-) drop me an email note with the info and I'll include it here.
The following list contains what I have gleaned from ongoing Usenet traffic. If you find an error, or have information not listed here, please drop me an email note and I will include it.
| Base Model | |
|---|---|
| Introduced | No info available yet... |
| CPU | (IP6) MIPS R3000 (12.5 MHz) with integrated MIPS FPA on board. |
| Memory | Integrated CPU memory on board (8 - 64 Mb), Standard 30-pin 9-chip parity SIMMS (80-100 ns). 8 Kb data cache, 16 Kb instruction cache. |
| Performance | 0.9 MFLOPS (double precision) 10 MIPS 7.5 SPEC |
| Graphics | "Entry", "TG" |
| Software | Will supposedly run up to IRIX 5.3 (IRIX 4.0.5 recommended because of CPU speed limitations) |
| Notes | First Personal IRIS in the series. |
| Base Model | |
| Introduced | No info available yet... |
| CPU | (IP10) MIPS R3000 (20 MHz) with integrated MIPS FPA on board. 32 Kb data cache, 64 Kb instruction cache. |
| Memory | Integrated CPU memory on board (8 - 64 Mb), Standard 30-pin 9-chip parity SIMMS (80-100 ns). |
| Performance | 1.6 MFLOPS (double precision) 16 MIPS 12.2 SPEC |
| Graphics | "Entry", "TG" |
| Software | Will run up to IRIX 5.3 |
| Base Model | |
| Introduced | Announced ???. Cost: $15,000 base, $25,000 TG. Replaced by 4D/35 ??? |
| CPU | (IP12) MIPS R3000 (30 MHz) with integrated MIPS FPA on board. 64 Kb data cache, 64 Kb instruction cache. |
| Memory | Integrated CPU memory on board (8 - 128 Mb), Proprietary 64-pin SIMMS with large ASIC on back. |
| Performance | 4.7 MFLOPS (double precision) 27 MIPS 25 SPEC |
| Graphics | "Entry", "TG" |
| Software | Will run up to IRIX 5.3 |
| Base Model | |
| Introduced | Announced ???. Cost: $19,000 base, $28,000 TG. Replaced by Indigo ??? Until recently, SGI still listed refurbished 4D/35 systems on their price sheet for $12,995 :-) |
| CPU | (IP12) MIPS R3000 (36 MHz) with integrated MIPS FPA on board. 64 Kb data cache, 64 Kb instruction cache. |
| Memory | Integrated CPU memory on board (8 - 128 Mb), Proprietary 64-pin SIMMS with large ASIC on back. |
| Performance | 6 MFLOPS (double precision) 33 MIPS 31 SPEC |
| Graphics | "Entry", "TG", Elan |
| Software | Will run up to IRIX 5.3 |
I have noticed that the graphics subsystems (except for the "Elan" ?) seem to be interchangeable across the 4D/20-35 family. This would imply that it should be possible to "mix and match". Note that the values for Polygons refer to 10x10 (100 pixel) full 24-bit color, Lighted Gouraud-shaded Z-buffered polygons with arbitrary orientation.
| Graphics | |
|---|---|
| Graphics modes | 30HZ, 60HZ, NTSC, PAL, and STR_RECT. |
| Cardset | GR1, GR1.1, GR1.2 or GR1.5 8-bit graphics (GR1.5 and possibly GR1.2 are upgradable to "TG") |
| Performance |
ZB3 24-bit Z-buffer optional BP4 24-bit color plane optional 88K 3DVectors, 9.4K Tmesh, 4.8K Polygons |
| Software | Known to work with IRIX 5.3 |
| Notes | ZB3 24 bit Z-buffer was optional BP4 24-bit color plane was optional It has been mentioned in the newsgroups that the GR1 and GR1.1 do not support X very well. See the general graphics notes below. In order to upgrade this to a "TG" the LSI graphics chip in the GR1.2 needs to be socketed (not soldered in place!), since it must be replaced by the GT2 piggyback cardset. |
| Graphics | |
| Graphics modes | 30HZ, 60HZ, NTSC, PAL, and STR_RECT. |
| Cardset | GR1.2 or GR1.5 8-bit graphics, BP4, ZB3, GT2 |
| Performance |
ZB3 24-bit Z-buffer BP4 24-bit color 220K 3DVectors, 34K Tmesh, 23K Polygons |
| Software | Known to work with IRIX 5.3 |
| Notes | 24 bits framebuffer 24 bits z-buffer 4 bits wid planes (not user accessible) 2 bits popup planes 2 bits overlay planes The man page for the G and TG states the following about supported modes: "STR_BOT and STR_TOP are supported on RE2 and RE2 turbo only." |
| Graphics | |
| Graphics modes | 30HZ, 50HZ, 60HZ, 72HZ, NTSC, PAL, IRIS3K, STR_RECT, STR_BOT, STR_TOP and 343.. |
| Cardset | GR2 |
| Performance | 24 bit color. 24 bit Z-buffer. 1M 3DVectors, 270K Tmesh, 120K Polygons (Fog effects, Anti-aliasing, Light modeling, Texture emulation.) |
| Software | Known to work with IRIX 5.3 |
There are apparently 2 flavors of GR1. These are referred to as "RE1" and "RE2". GR1.0 and GR1.1 are of the RE1 variety, while GR1.2 and above are RE2 boards. The advantages of RE2 over RE1 are listed below:
To remove the E-module, you only need to remove 1 (or possibly 2) screws on the lip of the module near the top of the chassis. You then lift the lip up, carefully tilting the E-module out of the chassis until the SCSI, system-ID, and power supply cable connectors are visible. Disconnect these cables, and the E-module should lift right out. The "outer" or main chassis and power supply for all 4 machines are virtually identical and exchangable, with the possible exception of the cooling fan (see the chapter on Cooling.) As far as I can determine, there were 2 variants of this main chassis. An early version provided rail-based drive bays for only two accessory drives which were installed from the top/front of the machine. The main hard drive was installed via a metal bracket which can only be accessed by removing the left-hand "skin" and cover. The newer (and more common) variant of the main chassis provides a rail-based drive bay for the main drive, accessible from the front of the unit via a large brown hinged access cover directly below the access cover for the 2 accessory drive bays. Although the older version of the main chassis may seem less flexible, in actuality it is preferable, since the main drive mounting hardware in this version uses a standard 40-pin IDC SCSI connector, eliminating the need to cludge up a SCSI/Power adaptor for the rail connectors. These rail drive-mounting kits (which are the same ones used for the SGI Crimson series) are available from 3rd party suppliers, but they are still a bit pricey.
The E-module consists of a metal sub-chassis housing the CPU and Graphics boards. The E-Module also provides a single 6U VME slot for accessory VME cards. Note that the E-Modules for the 4D/(20-25) and 4D/(30-35) are quite different! The '35 E-module is deeper than the '25, and the bottom has a slight slope in order to accomodate the power supply cabling harness that runs under the E-module when it is installed in the main chassis. This difference precludes using the metal housing of the '25 E-module when upgrading to a '35. The '35 E-module also provides a "mixer fan" on the inside CPU cover of E-module. Apparently, this cludge was added to eliminate thermal hot spots from forming over the R3000 and/or FP Math chip. Make certain that this small mixer fan is operating! failure of this fan could result in your system cooking itself to death!
There are two main architectures within the Personal IRIS series, and both use completely different SIMM designs. The 4D/(20-25) systems use industry standard 30-pin true parity SIMMS. The 4D/(30-35) (and also the Indigo R3000) make use of SGI-developed proprietary 64-pin SIMMS.
SGI R3000 SIMMS usually come in 2Mb, 4Mb, 8Mb and 16Mb flavors, and may be used in any combination (as long as you observe the restriction that SIMMS must be installed in banks of 4, all of the same size.) Note that there is one peculiarity that you should watch out for when using 4Mb SIMMS. Due to a memory initialization bug in the '35 boot EPROM, only one set (i.e. 4) of 4Mb SIMMS may be installed in any one machine. This restriction applies only to the 4Mb flavor. You can then fill out the rest of the available banks with any of the other SIMM sizes.
fill -v 0 0xa0400000
Then press the reset button (do NOT power the system off). This command will initialize memory to a known and expected bitpattern, and during the next boot cycle the memory will retain this pattern (if you haven't powered your system off.) The '25 should now size memory properly, and should continue to do so as long as you don't power the '25 off between system resets.
The capabilities of the '30 and '35 are significantly improved over those of the '20 and '25, owing to the complete redesign of the audio subsystem for the later machines. Some early versions of the '35 may not have the audio "option", however, as the audio subsystem was not ready in time for the initial release of the '35.
| Function | Tip | Ring | Sleeve | Input Impedance | Output Impedance | Full Scale |
|---|---|---|---|---|---|---|
| Digital I/O | Out | In | Ground* | 75 Ohm | 75 Ohm | |
| Microphone | In | Ground | 2K Ohm | |||
| Line In | L In | R In | Ground | 5K Ohm | 1-10 Vpp | |
| Line Out | L Out | R Out | Ground | 600 Ohm | 6 Vpp | |
| Headphones | L Out | R Out | Ground | 16 Ohm | 280 Mw | |
Notes:
| ||||||
You've just been bitten by the NVRAM password option available on some of the 4D/3x and later series. Fortunately, there are a couple of ways around this, so go get a dust pan, sweep up your hair, and read on...
nvram -v passwd_key
[new password]
will change the NVRAM password and print out the new value.
Try to keep the system power-up time to a minimum when doing this. With the E-module half-in/half-out, the cooling system is almost totally compromised, and your E-module will cook itself if power is left on for any length of time.
The Personal series systems use 3 types of serial ports. The 4D/20-25 use the SGI 9-Pin DB9 Standard, while the 4D/30-35 use the standard DB25 Serial port pinout for port 1, and a mini-din-8 connector for the rest. Check the IRIX man page serial for more information.
It is interesting to note the the SGI mini-din-8 serial connector on the 4D/30-35 and Indigo was designed to allow the use of Macintosh peripherals. One interesting use of the Macintosh mode is to control Macintosh Serial-to-MIDI interface adapters. When the port is configured in MAC mode, It is possible to supply an external baud clock via pin 2 (HSKi). This capability is needed to accomodate the rather unusual MIDI data clock rate. On some of the earliest machines there was a problem with the Macintosh emulation mode. Usenet posts from around the same time period indicated that SGI believed the problem would be corrected in later revisions of the 4D/30-35. I am not certain that this correction ever occured. The problem seemed to stem from the fact that some Macintosh peripherals powered themselves from the DTR/HSKo serial line. Apparently, SGI serial ports are not quite as capable of supporting parasitically powered devices as are the ports on a Mac. If you run into this problem, you might consider building a serial adaptor cable that splits off the DTR/HSKo line going to the peripheral and provides power to it via a separate wall-wart style 5Vdc regulated supply. Again, be careful and take pains to ascertain which line the peripheral is actually drawing power from or you could do nasty things to your peripheral! :-)
A good description of the MacIntosh serial-port emulation problem can be found on the Configuring and Debugging SLIP and PPP Connections page maintained by Scott Henry. Take a look at the chapter entitled Serial Port Design History. It gives a very good description of the design tradeoffs that SGI had to make in order to provide a useful dual-capability (standard RS232C serial and Mac) serial port. I strongly recommend reading this if you are trying to use Macintosh peripherals (such as MIDI adaptors) on your Persional IRIS 4D/30-35 or Indigo.
If you wish to use your IRIS or Indigo with a modem, you will need to wire-up a modem cable. Don't try to use commercial Macintosh modem cables. Even the ones that advertise themselves as "Hardware Handshake capable" generally don't provide all the required handshake signals. Your best bet is to wire one up yourself. A quick way to do this is to buy a Macintosh serial-to-printer cable, cut off one end, and attach a male DB25. The table below lists the appropriate pinouts for wiring a modem cable.
| Mini-DIN-8 Pin | RS232 Signal | RS232 Description | MAC Signal | MAC Description | Male DB25 Modem Connector |
|---|---|---|---|---|---|
| 1 | DTR | Data Terminal Ready | HSKo | Handshake (out) | 20 |
| 2 | CTS | Clear to Send | HSKi | Handshake (in) | 5 |
| 3 | TD | Transmit Data | TxD- | Transmit Data (-) | 2 |
| 4 | SG | Signal Ground | GND | Signal Ground | 7 |
| 5 | RD | Receive Data | RxD- | Receive Data (-) | 3 |
| 6 | RTS | Request To Send | TxD+ | Transmit Data (+) | 4 |
| 7 | DCD | Data Carrier Detect | GPi | General Purpose Input | 8 |
| 8 | SG | Signal Ground | RxD+ | Receive Data (+) | 7 |
A number of early posts refer to a hardware hack that was apparently popular within SGI itself, and which made it possible to have a two-color hardware-supported cursor on the PI. I am not currently aware of what added value this modification actually has, but I'll include it here for anyone who wishes to experiment. The gist of the modification is the addition of a Brooktree chip (Bt431KC) to the GR1.x Graphics board. If you remove the GR1.x board, you will notice an empty IC location (I8G6) next to the a Bt431KC which is already on the board. You simply :-) install a second Bt431KC in this location. Note that the IC pads at this location will be filled with solder, so you'll have to CAREFULLY remove the excess solder from each pad hole. If I were you, I'd strongly consider using an IC socket, if the board clearance allows it. I have NOT tried this modification myself, nor have I been able to locate a source for spare Bt431KC chips. Apparently, IRIX versions 4 and above detected the extra hardware cursor support and could make use of it. I don't know if IRIX 5.x retained this support.
The fully decked out 4D/35 is very picky about cooling. Make certain the cooling fan is not dying, and always suspect the cooling fan first when investigating repeated system crashes or graphics engine lockups! If it is making funny noises, or seems slow to start up, replace it! SGI found it necessary to provide a cooling fan "upgrade" kit for the 4D35 to address these problems, especially when they were upgraded to a TG configuration. These replacement fans were of the 105 CFM variety listed below.
The personal IRIS series use 12 VDC muffin fans. The specs for them are below:
| Manufacturer | Indek corp. (408) 432-1199. |
|---|---|
| 4D/20, 4D/25 | 75 CFM 450 mA fan (ELINA Model DA121238M) |
| 4D/30, 4D/35 | 105 CFM 540 mA fan (ELINA Model MDA121238H) |
The Power Series consists of a rather large number of configurations ranging in speed from 16 to 40 Mhz (Not counting the Crimson) and 1 to 8 Processors. These machines are still in everyday use at many installations. Despite this, a small number of the low end machines are beginning to find their way into the hands of hobbyists. The information that I have managed to collect on these systems is still woefully incomplete, but I will summarize what I've found to date in the hopes that it will aid those who have been lucky enough ;-) to latch onto one of these beasts.
The configuration table below lists the Power Series (Non Challenge models) that I know of. There may be others that I don't know about, and I may have made some errors in ones I have listed. Please note that these configurations represent models that were shipped by SGI, and may not be the only ones possible. An example of a unique (non-factory) configuration might be a 4D/220 with a VGXT graphics subsystem, or a hybrid multiprocessor system with 2 CPU cards of different speeds.
| Base Model | 4D/120 |
|---|---|
| Introduced | No info available yet... |
| Enclosure | Power Series Single or Twin Tower |
| CPU | IP5 Dual R2000 processors @16.7 Mhz No onboard memory. |
| Memory | Proprietary 80-pin SIMMS. Memory provided by MC2 memory array board (256 Mb Max.) |
| Performance | No info available yet... |
| Graphics | GTX, GTXB, VGX |
| Software | No support for IP5 after IRIX 5.3 |
| Notes | If anyone has the specs for this (or other) SGI systems, let me know and I will include them... |
| Base Model | 4D/210 |
| Introduced | No info available yet... |
| Enclosure | Power Series Single or Twin Tower |
| CPU | IP9 Single R3000 processor @25 Mhz Onboard memory supported. |
| Memory | Proprietary 80-pin SIMMS. Memory on IP9 plus memory on MC2 board can not exceed 256 Mb. Max. |
| Performance | No info available yet... |
| Graphics | GTX, GTXB, VGX |
| Software | No support for IP9 after IRIX 5.3 |
| Notes | If anyone has the specs for this (or other) SGI systems, let me know and I will include them... |
| Base Model | 4D/(220,240) |
| Introduced | No info available yet... |
| Enclosure | Power Series Single or Twin Tower |
| CPU | IP7 with dual R3000 processor modules @ 25 Mhz. No onboard memory. The /240 uses 2 IP7 boards. |
| Memory | Proprietary 80-pin SIMMS. Memory provided by MC2 memory array board (256 Mb Max.) |
| Performance | No info available yet... |
| Graphics | GTX, GTXB, VGX |
| Software | No support for IP7 after IRIX 5.3 |
| Notes | If anyone has the specs for this (or other) SGI systems, let me know and I will include them... |
| Base Model | 4D/280 |
| Introduced | No info available yet... |
| Enclosure | Rack Mount (Power Center?) enclosure |
| CPU | IP7 with dual R3000 processor modules @ 25 Mhz. No onboard memory. The /280 uses 4 IP7 boards. |
| Memory | Proprietary 80-pin SIMMS. Memory provided by MC2 memory array board (256 Mb Max.) |
| Performance | No info available yet... |
| Graphics | GTX, GTXB, VGX |
| Software | No support for IP7 after IRIX 5.3 |
| Notes | If anyone has the specs for this (or other) SGI systems, let me know and I will include them... |
| Base Model | 4D/310 |
| Introduced | No info available yet... |
| Enclosure | Power Series Single or Twin Tower |
| CPU | IP7 with single R3000 processor module @ 33 Mhz.
No onboard memory. |
| Memory | Proprietary 80-pin SIMMS. Memory provided by MC2 memory array board (256 Mb Max.) |
| Performance | No info available yet... |
| Graphics | GTX, GTXB, VGX, VGXT (SkyWriter?), RE (Reality Engine) |
| Software | No support for IP7 after IRIX 5.3 |
| Notes | If anyone has the specs for this (or other) SGI systems, let me know and I will include them... |
| Base Model | 4D/(320,340) |
| Introduced | No info available yet... |
| Enclosure | Power Series Single or Twin Tower |
| CPU | IP7 with dual R3000 processor modules @ 33 Mhz.
No onboard memory. The /340 uses 2 IP7 boards. |
| Memory | Proprietary 80-pin SIMMS. Memory provided by MC2 memory array board (256 Mb Max.) |
| Performance | No info available yet... |
| Graphics | GTX, GTXB, VGX, VGXT (SkyWriter?), RE (Reality Engine) |
| Software | No support for IP7 after IRIX 5.3 |
| Notes | If anyone has the specs for this (or other) SGI systems, let me know and I will include them... |
| Base Model | 4D/380 |
| Introduced | No info available yet... |
| Enclosure | Rack Mount (Power Center?) Enclosure |
| CPU | IP7 with dual R3000 processor modules @ 33 Mhz.
No onboard memory. The /380 uses 4 IP7 boards. |
| Memory | Proprietary 80-pin SIMMS. Memory provided by MC2 memory array board (256 Mb Max.) |
| Performance | No info available yet... |
| Graphics | GTX, GTXB, VGX, VGXT (SkyWriter?), RE (Reality Engine) |
| Software | No support for IP7 after IRIX 5.3 |
| Notes | If anyone has the specs for this (or other) SGI systems, let me know and I will include them... |
| Base Model | 4D/(420,440) |
| Introduced | No info available yet... |
| Enclosure | Power Series Single or Twin Tower |
| CPU | IP15 with dual R3000 processors @ 40 Mhz.
No onboard memory. The /440 uses 2 IP15 boards. |
| Memory | Proprietary 80-pin SIMMS. Memory provided by MC2 memory array board (256 Mb Max.) |
| Performance | No info available yet... |
| Graphics | GTX, GTXB, VGX, VGXT (SkyWriter?), RE (Reality Engine) |
| Software | No support for IP15 after IRIX 5.3 |
| Notes | If anyone has the specs for this (or other) SGI systems, let me know and I will include them... |
| Base Model | 4D/480 |
| Introduced | No info available yet... |
| Enclosure | Rack Mount (Power Center?) Enclosure |
| CPU | IP15 with dual R3000 processors @ 40 Mhz.
No onboard memory. The /480 uses 4 IP15 boards. |
| Memory | Proprietary 80-pin SIMMS. Memory provided by MC2 memory array board (256 Mb Max.) |
| Performance | No info available yet... |
| Graphics | GTX, GTXB, VGX, VGXT (SkyWriter?), RE (Reality Engine) |
| Software | No support for IP15 after IRIX 5.3 |
| Notes | If anyone has the specs for this (or other) SGI systems, let me know and I will include them... |
I have noticed that the graphics subsystems seem to be interchangeable across the Power Series family. This would imply that it should be possible to "mix and match". Of course, you must be realistic in your expectations. There may be some performance problems if you try to install a RE graphics cardset in a 4D/120. Also, as with the Professional Series, it appears that the color of the top and decorative trim panels of this series reflected a "color code" that can be used to quickly identify the graphics engine in that system. Unfortunately, I have not personally seen every member of this series, so I am unaware of some of the color codes.
| Graphics | ||
|---|---|---|
| Graphics modes | 30HZ, 60HZ, NTSC, PAL, 30HZ_SG (343 and STR_RECT with the RV2 cardset.) | |
| Color | Red Top (Twin Tower), Red Trim panel (single Tower) | -- |
| Cardset | GM2, GE4, RM1, (RV1.5 or RV2) | |
| Resolution | 1280x1024 screen resolution. | |
| Performance | Unknown planes... (probably same as GT) 100,000 gouraud shaded, z-buffered polys per second. Note that there appears to be 2 versions of this cardset. The GTX supports Alpha planes, and the GTXB does not. The RV2 cardset allows for stereo video and 343 mode. | |
| Software | Supported through IRIX 5.3.May be supported by newer versions of the OS if used in a >= R4000 based system. | |
| Graphics | ||
| Graphics modes | 30HZ, 60HZ, NTSC, PAL, HDTV, STR_RECT and 343. Custom formats are also supported. check the setmon man page for more details | |
| Color | Blue Trim panel (single Tower) | -- |
| Cardset | GM3, GE6, RM2, DG1 | |
| Resolution | 1280x1024 screen resolution | |
| Performance | 48 Bit Color, 24 bit Z-buffer. Unknown specs... | |
| Software | Supported through IRIX 5.3. May be supported by newer versions of the OS if used in a >= R4000 based system. | |
| Graphics | ||
| Graphics modes | 30HZ, 60HZ, NTSC, PAL, HDTV, STR_RECT and 343. Custom formats are also supported. check the setmon man page for more details | |
| Color | Unknown... | |
| Cardset | GM3, GE6, VS1, RM3, DG1 | |
| Resolution | 1280x1024 screen resolution | |
| Performance | 48 Bit Color, 24 bit Z-buffer. Accelerated Texture mapping. Unknown specs... | |
| Software | Supported through IRIX 5.3. May be supported by newer versions of the OS if used in a >= R4000 based system. | |
| Graphics | ||
| Graphics modes | 30HZ, 60HZ, 72HZ, NTSC, PAL, HDTV, VGA, STR_RECT and 343. Custom formats are also supported. check the setmon man page for more details | |
| Color | Unknown... | |
| Cardset | GE8, DG2, RM4 (1, 2 or 4 RM4 boards may be installed) | |
| Resolution | 1280x1024 screen resolution | |
| Performance | 192 Bit Color, 32 bit Z-buffer. Accelerated Texture mapping. 320 M TexPix, 1.1 M TMesh, 600K TexAA. | |
| Software | Supported through IRIX 5.3. May be supported by newer versions of the OS if used in a >= R4000 based system. | |
The Power Series family uses a number of different CPU cards ranging in speed from 16.7 Mhz to 40 Mhz. Some are dual CPU cards, while others are single CPU cards. All but 1 (the IP9) have no onboard memory support and require the use of an MC2 (or MC3) memory card. Each CPU card in the series supported serial I/O and a card-edge reset switch that performs a hardware reset on the CPUs resident on the card. When installing CPU cards in a Power Series chassis you need to observe a few simple rules:
Another interesting thing to note is that the IRIX man page serial indicates that a Stereo Field Sync signal is available from pin 3 of the DIN-8 powered serial port (a Professional/Power Series option.) I haven't come across any further reference to this signal. It might be intended for use with LCD shutter glasses, but your guess is as good as mine! If anyone has any further info, drop me an email note and I'll include it here. As far as VGX(T) or RE graphics subsystems, I don't have any definite info just yet...
!!!PLEASE NOTE!!!, I am not _recommending_ that you do this! In a home with inadequate wiring, this approach can be a fire hazard! I do not want to have people chasing me around with axes because their house burned down. I accept NO liability for any damage you may incur to yourself, your home or your system! You have been warned! I STRONGLY recommend that you have a certified electrician install a building code compliant 20-amp receptacle.
The thermal sensor is located in the top of the main tower. On the Twin Tower chassis, the thermal shutdown reset switch is located in the front of the smaller drive tower. It is accessed through a small hole just to the right of the lower drive bay. On the Single Tower chassis, the thermal shutdown reset switch is on the control panel located in the upper right corner of the front of the chassis. It is accessed through a small hole located just below the midway point of the 2 status LEDS.
The Power Series backplane seems to be divided into 3 segments. The first segment (slots 1-4) is a VME compliant 32 Bit bus. It is implemented using the P1 connector and row b of the P2 connector. External I/O may be implemented via rows a and c of the P2 connector. I don't believe the P3 connector is available for I/O use.
The second segment consists of slots 5-9 (or 5-8 on a Single Tower system). In the newsgroups, this has been referred to as the MP (or Powerchannel?) bus. It is a proprietary extension of the VME standard. It was designed to sustain a 64 Mb/s memory read access rate, and a 32 Mb/s memory and I/O write rate. DMA Based I/O can supposedly run at 32 Mb/s.
The third segment consists of slots 10-15 (or 9-14 on a Single Tower system). It is a proprietary bus used to support the various graphics cardsets. The bus will support the GTX, VGX, VGXT and RE graphics cardsets.
The interface between the 3 segments is facilitated by 2 slots with non-vme proprietary "hellofalong" card-edge connectors. The IO(2,3) card (slot 5) handles the bus interface between the VME an MP busses, and the first card in the graphics cardset (slot 10, or slot 9 on a Single Tower system) handles the interface between the MP bus and the graphics subsystem bus.
Note: If you install an optional card in the VME segment, you will need to remove the VME bus grant (BG) and Interrupt Acknowledge(IACK) jumpers for that slot. If you install a genlock card (CG2 or CG3), you will also need to install the 4 genlock jumpers on the backplane. These jumpers are located on the reverse side of the backplane. To gain access to the backplane, you will need to remove the back panel from the chassis. The BG and IACK jumpers are located between the P1 (top) connectors for slots 1, 2 and 3. The genlock jumpers are located just to the left of the slot 4 P3 (bottom) connector.
| Slot | Bus | Description | BG(1-4) | IACK | P1 abc | P2 b | P2 ac | P3 abc |
|---|---|---|---|---|---|---|---|---|
| 1 | VME | VME Slot 1 (empty) | in | in | || | || | ~ | = |
| 2 | VME | VME Slot 2 (empty) | in | in | || | || | ~ | = |
| 3 | VME | VME Slot 3 (empty) | in | in | || | || | ~ | = |
| 4 | VME | VME Slot 4 Genlock cardslot (empty) | Genlock Jumpers out | || | || | ~ | = | |
| 5 | MP | IO3 Card | Special card-edge connector | |||||
| 6 | MP | IP15 CPU card 1 | || | || | || | = | ||
| 7 | MP | IP15 CPU card 2 | || | || | || | = | ||
| 8 | MP | MC2 Memory card | || | || | || | = | ||
| 9 | MP | (empty) | || | || | || | = | ||
| 10 | Graph. | GM3 | Special card-edge connector | |||||
| 11 | Graph. | GE6 | || | || | = | = | ||
| 12 | Graph. | (Empty) | || | || | = | = | ||
| 13 | Graph. | (Empty) | || | || | = | = | ||
| 14 | Graph. | RM2 | || | || | = | = | ||
| 15 | Graph. | DG1 | || | || | = | = | ||
Key:
| ||||||||
| Slot | Bus | Description | BG(1-4) | IACK | P1 abc | P2 b | P2 ac | P3 abc |
|---|---|---|---|---|---|---|---|---|
| 1 | VME | VME Slot 1 (empty) | in | in | || | || | ~ | = |
| 2 | VME | VME Slot 2 (empty) | in | in | || | || | ~ | = |
| 3 | VME | VME Slot 3 (empty) | in | in | || | || | ~ | = |
| 4 | VME | VME Slot 4 Genlock cardslot (empty) | Genlock Jumpers out | || | || | ~ | = | |
| 5 | MP | IO3 Card | Special card-edge connector | |||||
| 6 | MP | IP15 CPU card 1 | || | || | || | = | ||
| 7 | MP | IP15 CPU card 2 | || | || | || | = | ||
| 8 | MP | MC2 Memory card | || | || | || | = | ||
| 9 | Graph. | GE8 | Special card-edge connector | |||||
| 10 | Graph. | DG2 | || | || | = | = | ||
| 11 | Graph. | (empty) | || | || | = | = | ||
| 12 | Graph. | (empty) | || | || | = | = | ||
| 13 | Graph. | 2nd RM4 | || | || | = | = | ||
| 14 | Graph. | 1st RM4 | || | || | = | = | ||
Key:
| ||||||||
|
| ||||||||||||||||||||||||||||||||||||||||||
|
|
There were also a number of much more sophisticated VME based audio interfaces for the Power Series. Unfortunately, I haven't been able to accumulate very much information on these yet. As I learn more, I'll expand this section.
Some revisions of the Twin Tower chassis may actually use the same LH Research power supply used in the Professional Series machines. Check the chapter in the Professional Series section entitled Power Supply problems for more info.
At first glance, there is one obvious difference between the Single Tower and Twin Tower systems (beside their physical appearance). This is the apparent absence of the 7-segment status LED, and the 8-position configuration switch on the Single Tower enclosure. This is actually quite deceiving. The system status panel on the Single Tower chassis is deliberately hidden from view. To access it, you will need to remove the status panel cover located in the upper right-hand corner of the front of the unit. This is the small black panel with the power and reset switch. There is a single screw on the left hand edge of this panel. Remove the screw (you may also need to remove the hard drives located in the top two bays) and lift the panel off. As the panel comes off, you will notice a PC board attached horizontally to the upper edge of the panel, connected by a ribbon cable to the rest of the system. Be careful when powering up the system with the status panel exposed. Don't just leave it dangling. Find somewhere safe (and non-conductive) place it.
This status panel provides the following system status indicators:
The following list contains the part numbers and a brief one-liner for all of the cards I know. If you have any knowledge of cards not in the list, drop me an email note and I will include it.
Notes: In the following table, A "Card" refers to an easily installable/removable option, usually plugging into a bus structure or connector of some type. A "Board" refers to an option which requires multiple cables, connectors, or manual chassis disassembly/assembly to replace or install.
| Professional IRIS Series: 4D/(50-85) | ||
|---|---|---|
| CPU/Memory Cards: | ||
| Part Number | Card ID | Description |
| 030-0011-001 | IP4 | 4D/70 CPU Card (12 Mhz) |
| 030-0121-001 | IP4 | 4D/50 CPU Card (8 Mhz) |
| 030-0122-007 | IP4.5 | 4D/80 CPU Card (16.5 Mhz) |
| 030-0126-001 | MXP | VME Memory Expansion Card for IP4.5 (32 Mb) |
| "G" or "T" Graphics Cardset: | ||
| 030-0013-002 | GF3 | Graphics Controller Card |
| 030-0058-001 | TB2 | 12-Bit Graphics Card |
| 030-0063-001 | ZB2 | Z-Buffer Card |
| 030-0067-006 | DE3 | 32-Bitplane Card |
| 030-0051-001 | --- | 64-Pin proprietary SIMMS used on DE3 card. |
| "GT" Graphics Cardset: | ||
| 030-0075-001 | GE4 | Geometry Engine Card |
| 030-0076-004 | GM1 | Graphics Manager Card |
| 030-0077-001 | RV1 | Raster Video Card |
| 030-0077-003 | RV1 | Raster Video Card (No Alpha plane) |
| 030-0078-001 | RM1 | Raster Memory Card |
| 030-0078-002 | RM1 | Raster Memory Card (No Alpha plane) |
| Power Series: 4D/xxx | ||
| CPU Cards: | ||
| Part Number | Card ID | Description |
| ???-????-??? | IP5 | R2000 Dual CPU Card (16.7 Mhz) |
| ???-????-??? | IP9 | R3000 Single CPU Card (25 Mhz) |
| 030-0135-008 | IP7 | Dual CPU Module Carrier Card (Supports 2 Modules) |
| ???-????-??? | SM7 | R3000 CPU Module for IP7 (25 Mhz) |
| 030-6512-002 | SM7 | R3000 CPU Module for IP7 (33 Mhz) |
| 030-0199-005 | IP15 | R3000 Dual CPU Card (40 Mhz) |
| Memory Cards: | ||
| 030-0117-026 | MC2 | Low Density Memory Expansion Card (2Mb SIMMS ?)(256 Mb Max.) |
| ???-????-??? | MC3 | High Density Memory Expansion Card (8 Mb SIMMS ?) (??? Mb Max.) |
| IO Cards: | ||
| ???-????-??? | IO2 | Single Port IO controller Card (SCSI, Ethernet, etc.) |
| 030-0180-001 | IO3 | Single Port IO controller Card (SCSI, Ethernet, etc.) |
| 030-0210-005 | IO3 | Dual Port IO controller Card (SCSI, Ethernet, etc.) |
| "GTX" Graphics Cardset: | ||
| 030-0075-001 | GE4 | --same as in GT-- |
| 030-0085-005 | GM2 | Graphics Manager Card |
| 030-0154-001 | RV1.5 | Enhanced Raster Video Card (stereo video?) |
| 030-0154-003 | RV1.5 | Enhanced Raster Video Card- No Alpha plane. |
| 030-0381-003 | RV2 | Enhanced Raster Video Card Option (stereo video?) |
| 030-0078-001 | RM1 | --same as in GT-- |
| 030-0078-002 | RM1 | --No Alpha...same as in GT-- |
| "VGX(T)" Graphics Cardset: | ||
| 030-0213-005 | GM3 | Graphics Manager Card |
| 030-0153-004 | GE6 | Graphics Engine Card |
| 030-0190-001 | VS1 | Texture Acceleration(?) (VGXT only) |
| 030-0156-004 | RM2 | Raster Manager Card (VGX) |
| 030-0220-001 | RM3 | Raster Manager Card (VGXT) |
| 030-0218-004 | DG1 | Graphics Output Card |
| "RE" Graphics Cardset: | ||
| ???-????-??? | GE8 | Graphics Engine Card |
| ???-????-??? | DG2 | ??? |
| ???-????-??? | RM4 | Raster Memory Card |
| Personal IRIS Series: 4D/(20-35) | ||
| CPU Boards: | ||
| Part Number | Card ID | Description |
| 030-8081-002 | IP12+ | 4D/35+ CPU Board (36 Mhz, Magnum Audio?) |
| 030-8043-002 | IP12 | 4D/35 CPU Board (36 Mhz) |
| 030-8082-002 | IP14+ | 4D/30+ CPU Board (30 Mhz, Magnum Audio?) |
| 030-8068-002 | IP14 | 4D/4D/30 CPU Board (30 Mhz) |
| 030-8029-001 | IP10 | 4D/25 CPU Board (20 Mhz) |
| 030-8000-003 | IP6 | 4D/20 CPU Board (12 Mhz) |
| Base Graphics Boards: | ||
| 030-8002-004 | GR1 | Main Graphics Board (8-bit) |
| 030-????-??? | GR1.1 | Main Graphics Board (8-bit) |
| 030-????-??? | GR1.2 | Main Graphics Board (RE2, 8-bit, upgradable to TG) |
| 030-8031-001 | GR1.5 | Main Graphics Board (RE2, 8-bit, upgradable to TG, Has VGA-style connector in addition to RGB BNC's)) |
| 030-????-??? | GR2? | Elan graphics (/30, /35 only?) |
| Graphics Option Boards: | ||
| 030-8003-001 | BP4 | GR1.x 24-Bit Plane option card |
| 030-8004-003 | ZB3 | GR1.x Z-Buffer option card |
| 030-????-??? | GT1/GT2 | GR1.x Graphics accelerator (TG) option. This is a piggyback 2-card set the provides 4 geometry engines. |
| Misc. Option Boards: | ||
| 030-8064-004 | Magnum Audio | Enhanced audio option board for /30 and /35 systems. Provides Indigo-like audio? |
| Generic 4D supported VME-bus cards | ||
| Misc. Option Cards: | ||
| Part Number | Card ID | Description |
| 013-0205-001 | --- | 1/4" Tape Controller (QIC-02) |
| 013-0206-001 | --- | 1/2" Tape Controller (Xylogics) |
| 013-0208-001 | --- | 6 Port Serial I/O Card |
| 013-0207-001 | --- | Parallel Plotter Interface (IKO) |
| 030-0045-001 | CG2 | NTSC Genlock |
| 013-0203-001 | --- | ESDI Disk Controller (2 Drive) |
| 013-0204-001 | --- | Ethernet Interface |
| Note: These are VME 6U cards which install directly into the 4D/20-35, or via 6U-to-9U adapters in the 4D/xxx series systems. | ||
| INDIGO Cards | ||
| Elan Graphics Cardset: | ||
| Part Number | Card ID | Description |
| 030-8058-006 | GR2? | Main Graphics board W/4 GE-7's |
| 030-8060-001 | ZB4 | Z-Buffer board |
| 030-8093-002 | VB1 | Video Buffer board |
| 030-8059-002 | VM2 | Video memory board |
The Philips SAA1099 Sound Generator contains the following subsystems:
The internal modules of the SAA1099 are arranged in 2 banks, presumably to allow separate configurability for each of the 2 audio channels. Each bank consists of 3 frequency generators, 3 frequency/ noise mixers, 3 dual-output amplitude controllers, 1 noise generator and 1 envelope controller.
There are also 2 Mixer/Output stages, one for each audio channel, which provide some cross-channel mixing capability.
In order to reduce confusion, we will specify the groupings below:
| Bank 0 | Bank1 |
|---|---|
| Frequency generators 0-2 | Frequency generators 3-5 |
| Frequency/noise mixers 0-2 | Frequency/noise mixers 3-5 |
| Amplitude controllers 0-2 | Amplitude controllers 3-5 |
| Noise generator 0 | Noise generator 1 |
| Envelope controller 0 | Envelope controller 1 |
| Mixer/Output stage 0 | Mixer/Output stage 1 |
Each of the 6 frequency generators can select one of 256 tones from one of 8 octaves. The frequency generators are arranged in 2 banks of 3 each, along with one noise generator per bank. The tone map is as follows:
| Octave | Frequency |
|---|---|
| 0 | 31 - 61 Hz. |
| 1 | 62 - 122 Hz. |
| 2 | 122 - 244 Hz. |
| 3 | 245 - 488 Hz. |
| 4 | 489 - 977 Hz. |
| 5 | 978 - 1950 Hz. |
| 6 | 1960 - 3910 Hz. |
| 7 | 3910 - 7810 Hz. |
All the frequency generators may be turned on or off by an enable bit. There is also a reset bit allowing all the generators to be synchronized with each other.
If you choose to use one of the preset noise sources, you can then mix the output of that generator with the three frequency generators in that noise generator's bank. i.e. noise generator 0's output may be mixed with the outputs of frequency generators 0-2, and noise generator 1's output may be mixed with the outputs of frequency generators 3-5. If you choose to use a frequency generator for a source, then frequency generator 0 may be used to supply the source for noise generator 0, and frequency generator 3 may be used to supply the source for noise generator 1.
| Bank 0 | Bank 1 | |
|---|---|---|
| Modulation Source | Frequency generator 2 | Frequency generator 5 |
| Modulation Target | Frequency generator 1 | Frequency generator 4 |
When modulation is selected, both left and right outputs of the frequency generator's associated amplitude controller are modulated. In this case, the resolution of the modulated amplitude controller is reduced to 8 levels (the LSB is ignored). It is also possible to configure the amplitude controller such that the "right" output modulation is the inverse of the "left" signal.
Each envelope controller has 8 operating modes:
A direct enable bit can be used to start the envelope. It is also possible to supply an alternate modulation frequency to the amplitude controller by simply writing to the address buffer register. Note that if the frequency generator supplying the input signal to the amplitude controller is turned off, then the output of the amplitude controller will simply be the modulation envelope. You can use this approach to generate a non-square output signal.
Note: All empty fields are "don't cares" and should be written as zeros. The following 00 to 1F block of registers repeats 8 times in the chip's total address space (00-FF.)
| Register Address | D7 | D6 | D5 | D4 | D3 | D2 | D1 | D0 | Operation |
|---|---|---|---|---|---|---|---|---|---|
| 00 | AR03 | AR02 | AR01 | AR00 | AL03 | AL02 | AL01 | AL00 | Amp. Chan 0 L/R |
| 01 | AR13 | AR12 | AR11 | AR10 | AL13 | AL12 | AL11 | AL10 | Amp. Chan 1 L/R |
| 02 | AR23 | AR22 | AR21 | AR20 | AL23 | AL22 | AL21 | AL20 | Amp. Chan 2 L/R |
| 03 | AR33 | AR32 | AR31 | AR30 | AL33 | AL32 | AL31 | AL30 | Amp. Chan 3 L/R |
| 04 | AR43 | AR42 | AR41 | AR40 | AL43 | AL42 | AL41 | AL40 | Amp. Chan 4 L/R |
| 05 | AR53 | AR52 | AR51 | AR50 | AL53 | AL52 | AL51 | AL50 | Amp. Chan 5 L/R |
| 06 | Unused | ||||||||
| 07 | Unused | ||||||||
| 08 | F07 | F06 | F05 | F04 | F03 | F02 | F01 | F00 | Freq. Gen. 0 Tone |
| 09 | F17 | F16 | F15 | F14 | F13 | F12 | F11 | F10 | Freq. Gen. 1 Tone |
| 0A | F27 | F26 | F25 | F24 | F23 | F22 | F21 | F20 | Freq. Gen. 2 Tone |
| 0B | F37 | F36 | F35 | F34 | F33 | F32 | F31 | F30 | Freq. Gen. 3 Tone |
| 0C | F47 | F46 | F45 | F44 | F43 | F42 | F41 | F40 | Freq. Gen. 4 Tone |
| 0D | F57 | F56 | F55 | F54 | F53 | F52 | F51 | F50 | Freq. Gen. 5 Tone |
| 0E | Unused | ||||||||
| 0F | Unused | ||||||||
| 10 | O1-2 | O1-1 | O1-0 | O0-2 | O0-1 | O0-0 | Octave Select: Freq. Gen. 1 & 0 | ||
| 11 | O3-2 | O3-1 | O3-0 | O2-2 | O2-1 | O2-0 | Octave Select: Freq. Gen. 3 & 2 | ||
| 12 | O5-2 | O5-1 | O5-0 | O4-2 | O4-1 | O4-0 | Octave Select: Freq. Gen. 5 & 4 | ||
| 13 | Unused | ||||||||
| 14 | FE5 | FE4 | FE3 | FE2 | FE1 | FE0 | Freq. Gen. Enable | ||
| 15 | NE5 | NE4 | NE3 | NE2 | NE1 | NE0 | Noise Enable | ||
| 16 | N1-1 | N1-0 | N0-1 | N0-0 | Noise Gen. 1 & 0 Enable | ||||
| 17 | Unused | ||||||||
| 18 | E0-7 | E0-5 | E0-4 | E0-3 | E0-2 | E0-1 | E0-0 | Envelope Gen. 0 | |
| 19 | E1-7 | E1-5 | E1-4 | E1-3 | E1-2 | E1-1 | E1-0 | Envelope Gen. 1 | |
| 1A | Unused | ||||||||
| 1B | Unused | ||||||||
| 1C | RST | SE | Freq. Reset Sound Enable (All channels) | ||||||
| 1D | Unused | ||||||||
| 1E | Unused | ||||||||
| 1F | Unused |
One of the monitors commonly supplied with 4D series machines was the Hitachi CM2086A3SG. This is a 20" RGB Sync-on-green monitor with the following characteristics:
| Resolution | 1280 x 1024, 60 Hz. |
|---|---|
| Scan Rate | 63.9 Khz Horiz., 60 Hz Vert. |
| Bandwidth | 100 Mhz. |
| Dot Pitch | 0.31 mm |
| Phosphor | P-22 |
The important characteristics here are the 63.9 Khz. Horizontal scan rate and the 60 Hz. Vertical Refresh rate.
If you happen across an SGI without a monitor, don't dispair! there are a number of ways to utilize monitors from other systems. Additionally, both the 4D50-80 series and quite a few of the 4D20-35 series have a separate Horizontal/Vertical or composite sync. capability, so the Sync-on-green requirement for a monitor may be avoided.
| Original Use | Manufacturer | Model | Tested on | Notes |
|---|---|---|---|---|
| PC | MAG Innovision | DX17F | 1 | 2 |
| PC | NEC | 3V | 3 | 2 |
| PC | NEC | Multisync Plus | 3 | 2 |
| PC | NEC | XP21 | 2 | 1 |
| PC | JVC | GD-H6120SFW | 4 | 3 |
| Dec VRT16-DA | Sony | GDM-1601 | 3 | 3 |
| ||||
| ...If you know of any others, drop me an email note and I'll add them to the list... | ||||